Tag Archives: foodie

Salad “Tashkent”

 Tashkent is the capital of Uzbekistan, one of the former USSR countries. According to one version this salad was created in Moscow during USSR times, when Soviet government set the task to popularize the various national cuisines of the Soviet Union. Due to a very limited availability of the ingredients in most parts of the USSR, Soviet cuisine can be characterized as simple. So, the salad also had to be simple, tasty and nourishing. Another version says that the salad was created by chef of the “Tashkent” restaurant in Moscow, where it also was served for the first time.
 Main ingredients are boiled beef and green radish, sounds simple but believe me the salad will be very tasty! Unhealthy side is dressing, because it’s mayonnaise. So, I suggest to make and eat this salad during weekend, or serve it for a special occasion and everyone will certainly be in awe. 😉 You can also substitute mayo with sour cream, but the taste will be slightly different. Another option for dressing is flavorful sunflower oil, that sometimes mixed with a teaspoon of vinegar. Chose the option and enjoy the salad! 
Tashkent Salad
  • Servings: 4
  • Difficulty: easy
  • Print
Ingredients 
400-500g beef fillet
800-900g green radish (I used daikon/Chinese white radish)
4 eggs, hard-boiled
1 large brown onion
2 tbsp sunflower oil for frying
100-150g mayonnaise for dressing (or sour cream/sunflower oil)
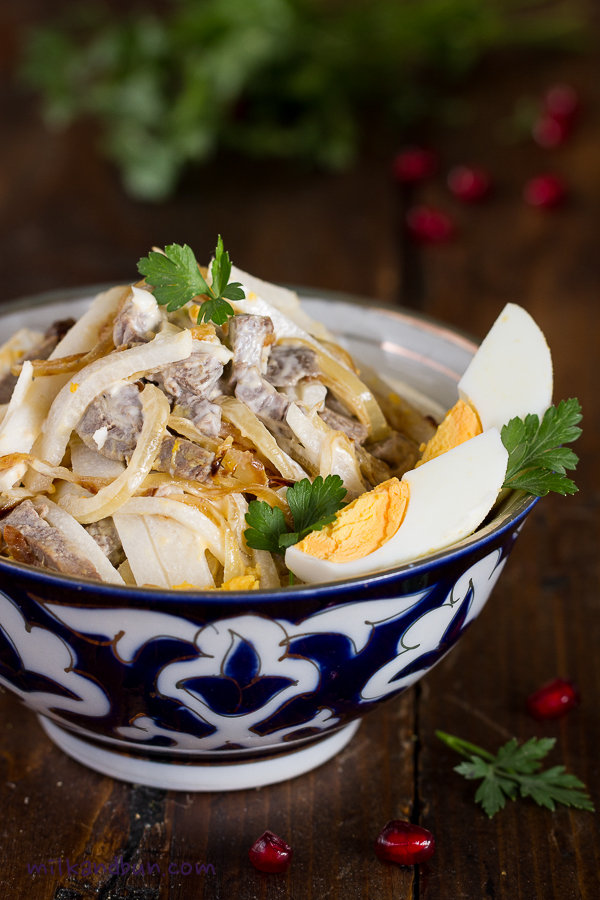
fresh chopped coriander or parsely for serving, optional
pomegranate seeds for serving, optional
salt, black pepper to taste
 
Preparation
  1. In a large pan, put the raw meat, cover with cold water, season with salt. Bring to boil, remove the foam, reduce the heat to medium, and simmer for 50-60 minutes. Optionally, you can add few peppercorns, bay leaf, small onion to get aromatic stock which you can use later. Cool the meat, then cut into julienne (thin strips).
  2. Cut eggs into thin strips. Optionally, instead of cutting eggs into strips you can cut them into 4 wedges and garnish the salad.
  3. Cut radish into julienne. Sprinkle radish with salt and let stand for 15 minutes, drain the liquid. If you are using green radish, cover it with cold water and leave for 1 hour to get rid of bitterness; then drain the water.
  4. Thinly slice the onion into half-moon. Heat the oil and fry the onion until golden-brown.
  5. In a large serving bowl, mix radish with onion, add beef, season with salt and pepper. Carefully stir in eggs and dress with mayonnaise. Garnish with coriander/parsley and pomegranate seeds.

Sharing at lovely Fiesta Friday party by Angie, and co-hosts this time Jhuls and Laurie.

Midweek Raspberry Dessert

I made this dessert less than for 15 minutes! Needless to say, it’s a perfect treat for busy days. Don’t know about you, but I need something sweet after the main course! 😀 I really miss pies or danishes, if I don’t eat them at least once a week. Exactly the same situation was yesterday – the pantry was full of my fav dark chocolate, but I wanted a pie or cake!
 I’m a huge fan of Jamie Oliver and even consider him as my virtual mentor! 🙂 Might you’ve seen food-videos with him and another young guy – Donal Skehan; they both provide inspirational ideas and recipes. I love raspberries! So, I chose this recipe, but adapted it, and made chocolate crust. And wow! Tartlets tasted soooo good! Reach chocolate crust along with tender berry filling gave the brilliant result! Yum!
 Choco-berry tart
Ingredients for two 11cm/4inch baking tins
85g plain flour
30g cocoa powder
30g fine sugar
60g butter, cold and cubed
1/2 tsp baking powder
2 Tbsp ice cold water
120g raspberries
50-60g strawberries, cut
130-150ml creme fraiche
1 tsp icing sugar
Method

In a bowl or food processor combine the flour, cocoa and baking powder, sugar and butter until it forms a dough.
Press the dough with your fingertips into baking tins. Put in a fridge for 30 minutes.
Mix together berries, creme fraiche and icing sugar; then spread over the dough.
Bake in preheated 210C/410F oven for 15 minutes. Then lower the heat to 150C/300F and bake for 20 minutes more.

Enjoy!

Kulebyaka – Russian pie

 Kulebyaka or Coulibiac is an authentic Russian hot pie, which has an oblong shape and features several fillings.
The word became from old Russian verb – ‘kulebyachit’, that means to make with hands, to shape, to bend and to knead.
 Pies are always have been loved in Russia. Even famous Russian writers as N.Gogol and A.Turgenev glorified pies in their works. Various pies were always made for every holiday and festival, though it was posh royal celebration or small peasant occasion. Large pies stuffed with several ingredients were really popular, they were baked on Butterweek and Easter and served in taverns and small tea-houses, where each owner had a special recipe and baked very individual pies, different from anyone else’s, i.e. opened and closed pies, feature simple (potatoes or cabbage) or complicated (sturgeon with buckwheat) filling.Festive&Delicious Kulebyaka by milkandbun
  Only in the 17th century, the grand oblong pie, that features several fillings, was named ‘kulebyaka’. The pastry shell was usually made from the yeast dough (the recipe is below). The main distinction of the kulebyaka-pie from any other Russian pie is that the quantity of the filling should be two or three times exceeds the quantity of the pastry; the filling of grand (festive) kulebyaka is usually complicated and separated with thin pancakes.
 The most popular fillings are salmon with buckwheat, ground meat with boiled eggs and rice, cabbage with mushrooms and onions, or visiga – a spinal marrow of the sturgeon, the last one is the unusual ingredient for nowadays, but in the 17-18th centuries it was very common.
 In the 19th century, French chefs, who had worked in Russia, brought the recipe to France and adapted it to the modern cookery, thus the kulebyaka became popular pie not only in Russia. 🙂Beautiful Kulebyaka/Milkandbun
Here is my version of the festival kulebyaka.

Kulebyaka - Russian pie

The yeast dough:
3tsp/5g instant dry yeast
100ml warm milk (or warm water)
2tsp white sugar
2 eggs, at room temperature
1 tsp salt
200ml milk (or water), at room temperature
100g butter, melted
~600g all-purpose/plain/white flour
  1. In a cup, stir warm milk, sugar and yeast together. Let stand until foamy about 10 minutes.
  2. In a big bowl, crack eggs, add sugar, salt, milk, melted butter and stir together. Add sifted flour, yeast mixture and knead the dough until it’s smooth.
  3. Cover the bowl with wet cloth, put in a warm place and leave to rise for 1 hour. After the time, knead the dough again. Repeat this step one more time.
The quantity of dough is enough for kulebyaka and one big pizza.
The filling:
600g fresh salmon, cut into small cubes
100g basmati or jasmine rice, cooked
200g mushrooms, sliced and fried
1 big onion, sliced and fried
4 eggs, cooked and chopped
2+2 Tbsp finely chopped dill and parsley
salt and freshly ground black pepper
The pancakes’ recipe you can find here. You can reduce the pancakes’ batter by half, because you need approximately 9 pancakes.
The glaze:
1 egg yolk beaten with 2Tbsp milk, 1/2tsp salt and 1/2tsp sugar
Assembling:
  1. On a floured surface, roll out the dough to approximately 26cm*35cm rectangular and 6mm thick. You can roll the dough on a piece of baking parchement, thus it’ll be much easier to transfer the pie on a baking tray; moreover, you need to turn the pie upside down-the sealing should be on the bottom.
  2. Coat the rolled dough with the pancakes.
  3. Place the egg and herbs mixture lengthways down the centre of the dough.
  4. Then arrange the mushrooms and onion mixture on top.
  5. Next, arrange rice. And the last layer-salmon.
  6. Cover the filling with pancakes, shape it to make a rectangular.
  7. Then, fold the dough and seal the edges.
  8. Transfer the pie upside down to a baking tray.
  9. Decorate with pastry trimmings, and cut two slits in the top with a sharp knife.
  10. Keep for a proofing for 20 minutes. Brush the pie with egg wash.
  11. Bake in preheated 200C/400F oven for 30-35 minutes or until golden.
  12. Leave to cool slightly for 15 minutes before slicing.
  13. Serve with a glass of milk or a cup of freshly brewed tea.
Enjoy kulebyaka! 😀
 Also I’m really excited to take part in the challenge “yeast and herbs”, that Angie organized with Catherine. I almost thought to give up, because I’m using yeast very-very rare in baking, finally after many days of brain storm it dawned on me that I already baked one awesome pie, so I came up with this recipe. It only seems complicated to make, just try it once and you will see that ‘kulebyaka’ is drool worthy dish! 😀
 Moreover, are you parting at Fiesta Friday? Don’t ask me, because I do and now gonna check some great recipes, which have brought participants. Yay!
 

Vareniki

 Almost everybody in Russia knows and adores vareniki! So do I. 😀
Vareniki – are dumplings, stuffed with savoury or sweet filling.

Vareniki-9

It’s considered that vareniki is a traditional Ukrainian dish, but originally it came from Turkey. It was a dish made from boiled unleavened dough with meat and vegetables filling. When “Vareniki” appeared in Ukraine for the first time, they were called ‘diush-var’. The Ukrainian people liked this dish so much that these dumplings quickly spread over the Ukraine and beyond, and became widely-popular, turned into traditional Ukrainian cuisine and began to call as ‘vareniki, and this name simply means – boiled.
 Ukrainian savoury vareniki are usually topped with shkvarki – fried salted pork fat, and also can be topped with fried onions or just accompanied with sour cream according to local taste or preferences (i.e. last two toppings are quite popular in Russia).
 The most popular fillings are potatoes, mushrooms or fish. Vareniki could be also made sweet, with cherries or sweet cottage cheese filling.
There are many recipes of vareniki nowadays, with egg or sour cream in dough, based on water or kefir.
My recipe is the simplest one, and I used a mix of mashed potatoes and mushrooms. You can use the same dough for sweet fillings, such as cherries or black currant.
Here is the short video how I make these lovely twisted edges of the Vareniki.

Vareniki

  • Servings: ~70 pieces
  • Print
Vareniki can be frozen well, that’s why I usually make a big batch, put them in ziplocks and freeze! No need to defrost before cooking.
 
Ingredients
The dough:
500g plain flour
1 egg
2 tsp salt
200 ml warm water
The filling:
800-900 g potatoes, boiled and mashed
1 onion, cut into small cubes
300 g wild or button mushrooms, sliced
1 Tbsp oil + 1 Tbsp butter 
Small bunch of dill, finely chopped
Salt, pepper to taste
Garnish per portion:
1-2 Tbsp sour cream 
1 Tbsp chopped dill 
a knob of butter 
 
Method
  • Dissolve salt in warm water. On a flat surface make a well in the flour, add egg and salted water. Knead until the dough is pliable. Cover with plastic wrap or towel and let rest for 20 minutes.
  • Meanwhile, saute onion and mushrooms in oil and butter. In a bowl combine mashed potatoes with vegetables and dill. Season to taste. The filling is ready.
  • Roll the dough into 8cm/3-inch circles, place 1 tsp potato mixture into center, fold the dough over filling and press it.
  • Bring a large pot of salted water to boil (salt the water as for pasta or you like). Put vareniki into water and carefully stir with a spoon. When they come to the surface – cook for 4-5 minutes more.
  • Serve vareniki with sour cream, chopped dill and a knob of butter on top.
 You can brown vareniki a bit in a butter straight after the boiling. Serve with sour cream, but already without extra butter on top.
 
Enjoy the delicious vareniki! 🙂

Are you going to Angie’s party? You can try superb cocktail there! 😉

Linzer cookies

  I do love shortcrust pastries! It’s versatile, great choice of fillings allows your imagination run wild. 😀  Thus, is easy to guess that I’ve made so many shortbreads as well, some of them were not good and too crumbly for me, but I keep on.
 Linzer cookie is two nut-flavored cookies are sandwiched together with a jam, originally it was a torte, named after the city of Linz, Austrian. Do you know that such round-shaped cookies are called “Linzer eyes”. What a pretty name! 🙂
Love_cookies_v2-1
 Based on different recipes, I used following Linzer cookie recipe:
Ingredients
100g (1/2 cup) white sugar
1 egg
120g (1/2 cup) butter, cut into small cubes, room temperature
200g (1 1/2 cup) all purpose flour
90g (1 cup) almond meal
pinch of salt
1/2 tsp vanilla extract
1/4 tsp cinnamon
1 tsp lemon zest
50g (1/3 cup) or less powdered (icing) sugar
50-60 ml (1/4 cup) Raspberry jam
Method 
In a bowl on a table cream butter and sugar. Add the egg, vanilla and mix.
Finally, beat in the ground almonds.
Stir together dry ingredients in a bowl and add to the batter and blend.
Form into disk, cover with plastic wrap and chill for 30 minutes in the refrigerator.
Preheat oven to 180C/350F. Line baking trays with parchment paper.
Roll out pastry to 25-50mm (1/4-1/8 inch) thickness.
Cut out the cookies (if cookies are too soft-chill it again for 10-15 minutes).
Bake for 12 minutes. Allow to cool.
Spread 1/2 or 1tsp jam on the bottoms of solid cookies. Sprinkle the cut-out cookies with icing sugar, place them on top and sandwich them together.


The assembled cookies can be store in an container (in the refrigerator), or I keep them without jam, in a jar, and assemble when it’s needed 🙂Love_cookies_v2-3
Enjoy! Cookies are sooooo good! 😀
Love_cookies_v2-4
*You can cut out any shape, and use your favourite jam.
**In case if the pastry turned out too crumbly and difficult to roll it out, add 2tbsp of cold water, usually it helps me 🙂 
P.S. You can click on all photos to have a look it in full size.