Tag Archives: blog

Sunday Breakfast: Cheesy Onion Cookies

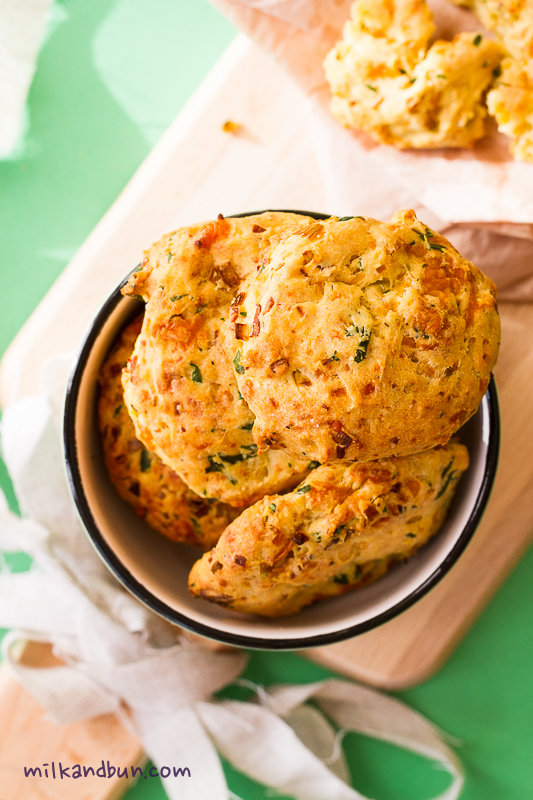
 Hello-hello! It’s been a kind of hectic week and I really didn’t have a time to post anything. But I can’t skip the Sunday breakfast series, so I decided to reblog one of my old recipes – savory onion cookies! I love this recipe: it’s quick&easy what especially valuable in the morning (ok, may be not that quick as a fried egg but worth any minute), and of course these cookies taste incredible! So, if you still haven’t tried them, click here to get the recipe. 🙂 These savory cookies combine many amazing ingredients, like a classic English cheese – Red Leicester or Cheddar, that adds a slightly sweet and nutty note to cookies, plus sautéed in butter leeks and some chilli flakes, which give you a nice and healthy jump start! 🙂 Enjoy!Onion_cookies

Radish-Cucumber salad

 Many of you already greeted the autumn season and began to bake various apple pies and cook hearty dishes. Autumn signs have been also trickling into Dubai, but slowly and it is still summer-like days here with plenty of strong sunshine during the day-time. Mornings and days, though still warm and sunny as usual, have been followed by lovely and cool evenings. Despite of all hot days, it’s a big advantage of living near the Gulf: we can enjoy the sea and sand any time over the year long. That’s what we did one afternoon – went to a beach. But before the joy of swimming in the sea, I prepared a very simple, light and fresh, and crunchy salad. It needs only few ingredients including beautiful radishes, which I found at local supermarket and just couldn’t resist picking up a huge bunch.Radishes-Cucumbers-Spring Onion

As you can see, the recipe is V-E-R-Y simple: all you need is lovefresh sliced cucumbers and bright radishes, chopped spring onions, some seasoning and sour cream!

Radish-Cucumber salad

 I like this salad. It reminds me summer holidays: staying at parents house, fun of gardening and eating lots of fresh veggies and berries. And for that reason I decided to mix up vegetable slices with traditional Russian dressing – sour cream, instead of olive oil. Simple and well-loved. Be generous with spring onion!  You may also add some chopped dill, if you wish.
Radish-Cucumber salad (with sour cream dressing)
 Don’t be sad if the summer is over in your place, I will post autumn recipes soon {more pie recipes are on the way..} Thanks for reading and Stay turned! 🙂

Olive Oil and Rosemary Crackers

 I’ve been on a homemade everything kick for a quite long time.. 😀 Homemade crackers is not an exception. I’ve tried lots of crackers recipes and usually crackers turned out like cookies, not very crunchy, tasted like shortbread cookies, or I was unable to roll out dough thinly. Finally, after tasting and comparing different recipes, I created my own recipe of salty crackers. You need only few ingredients to prepare these amazingly tasty, crunchy and aromatic crackers! The dough contains extra virgin olive oil and rosemary, natural bitterness and pepperyness of the oil and piney aroma of the herb give incredible taste and smell to the dough and crackers. You can make sticks, twists or roll out the dough very thinly and cut out any shape you like. I enjoy these crackers as is, it’s a nice midday snack; you can also make a sauce and dip crackers into it.Crackers Twists

This edible bouquet for all beautiful and wonderful ladies, who has brought many tasty dishes to Fiesta Friday party today! A feast for the eyes and the stomach! 😉Rosemary Crackers Bouquet

Olive Oil and Rosemary Crackers

  • Difficulty: easy
  • Print
Ingredients
160g strong/bread flour
130g wholemeal flour + more if needed
3/4 tsp baking powder
2 tsp ground sea salt
1/2 tsp freshly ground black or white pepper
1.5-2 Tbsp finely chopped fresh rosemary 
150ml water
90ml extra virgin olive oil
 
  • In a large bowl, mix flours, baking powder, salt, pepper, rozemary. Add water and mix with a spatula or wooden spoon. Add olive oil and mix again. Place the dough on a lightly floured surface and knead with hands. Add a bit more flour if the dough is too sticky.
  • Cut the dough into equal 6-8 pieces. Roll each piece into circle as thinly as you like, cut into squares, diamond shape. You can also cut into strips (1.5-2cm width, 15cm length) and then twist each strip.
  • Place crackers on a baking sheet and bake in preheated 220-230C (450F) oven for 10-11 minutes or until golden color.

I keep crackers in airtight container in the fridge up to 5 days.

 
Enjoy!

Coriander Chicken Drumsticks

 Today I realized that I haven’t ate chicken for quite a long time. When I was a teenager chicken drumsticks weren’t available as a separate part of a chicken. When my mother wanted to prepare chicken for dinner she used to buy whole chicken thighs and cook it as is or cut into two parts.. I’m not even sure that drumsticks are on sale in Russian stores now, may be except the capital. Anyway, nicely spiced and roasted chicken drumsticks is a good and quick-to-cook midweek meal (with some rice or potatoes on a side) or a very good accompaniment to a beer! For this recipe I grind dried coriander seeds, then add turmeric and mild paprika, stir into the meat along with olive oil and let it marinade. If you’re hungry, skip the marinating and roast it straightaway! 🙂Coriander Chicken Drumsticks

Coriander Chicken Drumsticks

  • Servings: 2-3
  • Difficulty: easy
  • Print

Ingredients
500g chicken drumsticks (I used without skin)
2-3 tsp dried coriander seeds
1 tsp turmeric
3/4 tsp mild paprika (or hot if you like)
2 tbsp olive oil
1 tsp lime juice (or lemon)
2-3 garlic clove, unpeeled
freshly ground black and white pepper, to taste
sea salt, to taste
  • Grind or crush coriander seeds, mix with turmeric and paprika. Combine with olive oil and lime juice. Rub the marinade into chicken drumsticks. Add garlic cloves, season generously with pepper and salt to taste. Cover and leave to marinade in the fridge for 1-3 hours, or skip this step and arrange chicken (with all marinade juices) onto a baking tray or dish.
  • Bake in the preheated 200C oven for 20 minutes. Then low the heat to 150C, cover with a piece of foil and bake for 10 minutes longer or until the drumsticks have cooked through.
  • Serve warm, but they are also good cold. The cooked drumsticks will keep in the fridge for 2 days.

Russian buckwheat kasha with mushrooms

 Buckwheat has always been a popular grain in Russia. It was brought in 7th century from Greece and soon became  extremely popular. Buckwheat was new and unknown grain in Russia, so it was called “Greek grain” or shortly “grechka”. It’s not a surprise why buckwheat was very beloved in old Russia: peasants called it “mother”, they grown it in a large amounts, so it was cheap and affordable grain. Moreover, it’s cooked quickly and has a high nutritional value – a plate of buckwheat kasha (porridge) for breakfast can keep you full for a long time. Buckwheat porridge was a favorite meal not only among peasants, it was also cooked for upper classes but with plenty of butter or sour cream. 
 Nowadays, there are lots of recipes with buckwheat, it’s cooked with milk and eaten for breakfast or as a side dish for meat like beefstroganov. Buckwheat porridge with fried onion and mushrooms is a popular dish in Russia, especially during the Great Lent when grains, vegetables and mushrooms become the main foods.
Russian Buckwheat Kasha
  Hope all lovely bloggers partying at Fiesta Friday will like this Russian buckwheat porridge, it contains vitamins, healthy organic acids and oils! Enjoy! 🙂

Russian buckwheat kasha with mushrooms

  • Servings: 2
  • Difficulty: easy
  • Print
During the Great Lent or for vegetarian option omit the butter or substitute it with any veg.oil 
IngredientsBuckwheat Kasha (porridge)
200ml buckwheat
400ml water
1 tsp butter
1 Tbsp sunflower or other veg.oil
1 large onion, chopped
200g mixed mushrooms (or 400g frozen), chopped
25-30g butter
salt, pepper to taste
fresh chopped parsley, optional
  1. Wash buckwheat, put it a thick-bottomed or iron-castle pan, fry on a low heat without any oil for 2-3 minutes. Add water and good pinch of salt. Bring it to boil on a medium heat, then reduce the heat to low, add a teaspoon butter and simmer for 17-20 minutes or until all water will be absorbed. Don’t stir buckwheat during the cooking. When it’s ready, take the pan off the heat, cover with lid and few kitchen towels, let it rest for 5-10 minutes.
  2. Meanwhile, heat the oil in a frying pan, add onion and fry for few minutes. Stir in mushrooms, season to taste and fry on a medium-high heat until mushrooms are ready.
  3. Stir the mushroom mixture and butter into buckwheat. Sprinkle with parsley, if desired. Serve warm as a main dish or side dish to chicken, stewed meat or sausages. Enjoy!

Buckwheat Kasha with mushrooms

1 3 4 5 19