Tag Archives: healthy

Red pepper Dip

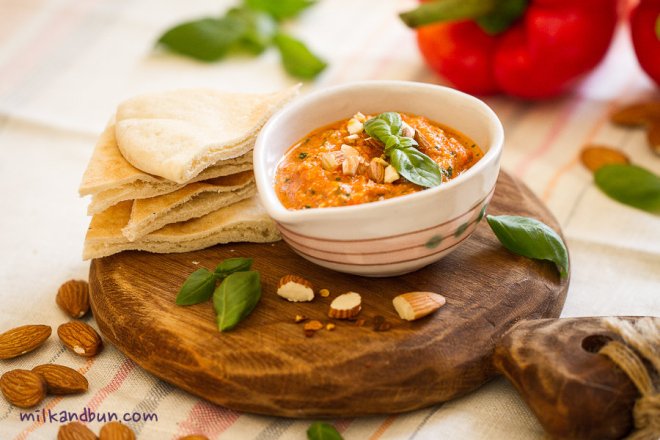
Hello-hello! If you have seen the previous post, I promised the recipe with roasted peppers, so for keeping you waiting for so long. Here it is. The dip is such a nice snack, especially for mums, when you are doing lots of thing at a time, it is easy to forget to feed yourself (of course not your child, haha). All you need for this lovely dip is to prepare roasted peppers ahead, and then just whizz peppers with nuts and oil in a blender until you have a rough paste. In fact, I actually prefer not to measure ingredients in such simple recipes, throw in as you feel – that’s all. Then scoop the dip into a beautiful bowl, put on a table with some sliced bread or crackers on the side, and dig in when you have a time. Red pepper dip goes nicely with roasted chicken or fried chicken breasts. Yum! Healthy, delicious and sooooo quick to prepare, sounds perfect. 😀
Roasted red pepper dip
I’ve tried this dip with a store-bought almond meal and homemade roasted ground almonds, and surprisingly I love the option with almond meal. Honestly speaking, I thought I would like a note of roasted nuts in the dip but I didn’t. The choice is up to you, try both and let me know what do you like more.
Dip with roasted red peppers and almonds
Tips
If you like it spicy – add chili flakes or chili oil.
If you want to make the consistency thinner – add a splash of water.
No nuts? Not a problem, make it nut free – sub almonds with breadcrumbs.
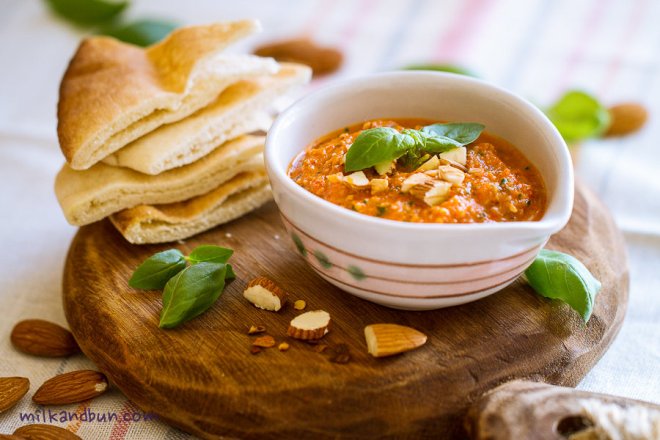
Red pepper dip

Red pepper Dip

  • Servings: 2
  • Difficulty: easy
  • Print
What You’ll Need
1 roasted&marinated red pepper
1 garlic clove from the marinade
1 tbsp EV olive oil
2 tbsp almond meal
6-8 basil leaves (optional)
1-2 tbsp water, optional (to thin the dip, if desired)
Salt, pepper, to taste
How to Make it
  • Put all ingredients in a blender, blend until desired consistency.
  • To make it thinner, add water – spoon by spoon, but not much!
  • Serve with bread, crackers or even chicken.
Enjoy!

Sunday Breakfast: Baked quail eggs

 When it’s not a weekend, sometimes being pressed for time can make hard to prepare anything for breakfast, and I’m not saying about to sit down and enjoy it, and you probably skip it day by day.. I never skip breakfast, and studies show that those who eat breakfast regularly lose weight! So be sure you eat a good and tasty breakfast! Like this protein-based, that starts your metabolism and your energy level will be fired up.
 You only need to put all ingredients together in a baking dish (small-individual or one large to share), crack small&tasty quail eggs in it and bake for few minutes. Meanwhile, you can make a fresh tea or toast some bread. Sunday Breakfast: Baked quail eggs

Baked quail eggs with Gruyère cheese, ham and spinach

  • Difficulty: very easy
  • Print
Ingredients
butter, for greasing baking dishes
fresh spinach leaves
cooked ham slices (1 large per person), cut into strips
5 or more quail eggs per person
1-2 tbsp grated Gruyère cheese per person
salt, crushed pink peppercorns to taste
Garnish
extra grated cheese
chopped parsley
cherry tomatoes
bread
Method
  • Preheat oven to 200C.
  • Grease baking dishes with butter.
  • Put in spinach, ham, 1/3 of cheese. Crack eggs, season with salt&pink pepper and sprinkle with some cheese.
  • Bake for 6-10 minutes or until the egg white is set.
  • Sprinkle with parsley, garnish with cheese. Serve immediately with cherry tomatoes and bread.
Enjoy!
Have a lovely and delicious weekend breakfast!

Baked quail eggs with  Gruyère cheese, ham and spinach

Millet bitochki

 Bitochki or bitki is the name for round-shaped, flattened cutlets (côtelettes/patties) in Russian cuisine, which are prepared from chopped meat or grains. Originally in old Russia, a good and expensive cuts of meat were flattened, cooked and called bitochki, but lately people adapted the recipe and began to use cheap meat. Any remaining meat was chopped, mixed with other ingredients and then served fried or baked. Poor people even used grains.MIlletBitochki
 Nowadays, not only poor one can make such bitochki. I used millet for mine. Bitochki are not only tasty, but healthy and it is a good option for a meatless day. Millet is one of the healthiest grain, moreover is considered to be one of the digestible and non-allergenic grains*. It contains lots of fiber and low simple sugar. Finally, bitochki have such a nice texture inside (it reminds a white fish a bit) and crispy outside.
 You can serve them with a lettuce-tomato salad on a side. I made mushrooms sauce, but if you are run out of time or lazy – serve with a good dollop of sour cream (or creme fraiche).
MIlletBitochki with mushroom sauce

Millet bitochki with mushroom sauce

  • Servings: 12 pieces
  • Difficulty: moderate
  • Print
Instead of mushroom sauce you can serve bitochiki with sour cream.
Bitochki as well as mushroom sauce can be made a day or two ahead and then gently reheated.
 
*You can use both cream and sour cream, or any one.
Ingredients
150g millet
500ml hot water
1 medium egg
2-3 tbsp finely chopped parsley
1 medium onion (any sort you like)
300g mushrooms (I used oyester and champinions), chopped
1 tbsp butter+ 1 tbsp olive oil, for mushrooms
20g butter
15-20g plain flour
100ml 35% cream*
2-3 tbsp sour cream*
150ml hot water
salt, freshly ground pepper to taste
2 Tbsp olive or sunflower oil, for frying
some chopped parsely, for garnish, optional
Preparation method
  • Wash millet throughly under running water, cover with hot water, season with some salt, bring to boil, then reduce heat to medium-low and simmer for 20-30 minutes or until millet is ready. You need to cool it completely. To make it faster, spread millet on a large plate and put in a fridge for 10-15 minutes, while preparing the mushrooms and sauce.
  • In a frying pan, heat butter and oil, add onion and fry for 5 minutes (set aside half of onions for millet ). Add mushrooms and fry on a hight heat for 10 minutes or until all liquid is evaporated (if there is any). Season to taste. Set aside 3-4 tbsp mushrooms for millet; then chop it finely.
  • Meanwhile, in a small pan, add butter and flour, stir on a medium heat for 5 minutes. Stir into mushrooms.
  • Pour over cream along with sour cream, give it a good stir. Pour in hot water. Check the seasoning. Simmer on a medium heat for 5-8 minutes. Add more hot water to reach desired consistency. Keep the sauce warm.
  • Transfer cooled millet in a mixing bowl, add egg, parsley, season with salt and pepper. Mix in fried onion and mushrooms. Combine the mixture. I didn’t use any flour, but if the mixture seems doesn’t want to resemble into a patty, add a tablespoon or two of plain flour.
  • Generously spread breadcrumbs on a large plate. With a tablespoon take a millet mixture and make a ball, pat it down with your hand or spoon. Cover in a breadcrumbs. Repeat with all millet mixture.
  • In a large frying pan, heat oil, put bitochki and fry on both sides until golden. To keep it warm while preparing others – put them in a preheated 120-150C oven.
  • Serve with mushroom sauce and sprinkle with extra parsley, if desired.
Enjoy!

Baked apples with walnuts and cowberries

Hi there! It’s been windy, dark and gloomy all day here in Dubai today. The weather intends to spend a day in the kitchen and bake something warm, aromatic and tasty. And I found a deliciously satisfying dish to cheer this day up! Sweet-smelling baked apples with super tasty filling: walnuts and cowberries! Sounds fantastic, doesn’t it? The cozy smell of cinnamon and brown sugar was filling my kitchen while apples were baked.. It’s so easy to turn regular apples into a fabulous warm dessert! Enjoy!

Baked apples-1Baked apples-2

 Cowberry (also known as lingonberry) is a very tasty, slightly bitter and sour berry; it contains lots of vitamin C, A and B. It’s a popular type of berry in my home-country (Russia), and as far as I know in Sweden and Norway. Their taste remind small sour cranberries, so you can easily substitute it with cranberries (fresh or frozen).Baked apples with walnuts and cowberry

Baked apples with walnuts and cowberries

  • Servings: 2
  • Difficulty: moderate
  • Print

*You can add more sugar to suit your taste.
**I dry-roast walnuts, then chop it or pulse in a food processor.
Ingredients
2 large apples (sort ‘pink lady’ or ‘granny smith’ are good)
20g/2 tsp butter
3 tsp brown sugar*
1/2 tsp cinnamon
1 quail egg, optional
5-6 tsp finely chopped walnuts**
3-4 tsp cowberries (if using frozen-no need to defreeze)
1/2 tsp of cinnamon, for garnish
2-3 tsp pure runny honey, for serving
some extra walnuts and cowberries, for serving
  • Cut the lid from apples, carefully cut out the core and make a hole in each apple leaving the bottom.
  • In a bowl, stir sugar and cinnamon with butter. Mix in the egg. Fold in chopped walnuts and berries.
  • Put apples in baking dish/tray and stuff each apple with filling mixture. Cover with apple lids. Pour some warm water into the bottom of the baking dish (1 cm). Loosely cover with foil.
  • Bake in preheated 200C oven for 30 minutes. Uncover and bake for 10-15 minutes more, or until apples are tender but not mushy.
  • Carefully transfer to a serving plate, sprinkle with cinnamon, drizzle with honey and garnish with some walnuts and cowberries, if desired.
  • Enjoy!

Cauliflower couscous with shrimps

 When I saw a cauliflower couscous recipe for a first time in a food magazine I didn’t pay much attention to it and dismissed it, and made another pan of creamy cauli soup. 🙂 But when I stumbled upon similar recipes again and again, I decided to give it a chance. 
 I red few recipes to know how to make a cauliflower couscous: the main thing is to pulse cauliflower florets in a food processor to get tiny bits, which reminds couscous grains and then you can mix it up with any your favourite ingredients. Thus, I came up with my own recipe. Even thou, I topped cauli couscous with shrimps, you may omit it and keep totally vegetarian. Whatever you choose, this dish is full of flavour! It’s a good alternative for a regular couscous, and especially for people with gluten sensitivity. Such couscous pairs well with roasted chicken or barbecued meat as well. Cauliflower couscous with shrimps
 And you know what, now it’s my fav way to prepare cauliflower! When I served it for a dinner my husband couldn’t guess what was that – whether pasta or couscous, but he liked it. Because it tasted divine: buttery and aromatic! 🙂

Cauliflower couscous with shrimps

  • Servings: 2
  • Difficulty: easy
  • Print
You can also try to add: chopped walnuts or pistachios, raisins, goji berries, chickpeas..
Ingredients 
Cauli’couscous
cauliflower 400g
baby onion 5-7, sliced
1 garlic clove, chopped, optinal
olive oil 1 tbsp+ butter 1 tbsp, for frying
lemon juice 1 tbsp
sea salt, black&white pepper to taste
chopped mint 1 tbsp
chopped parsley 1 tbsp
olives 6-7, stoned
extra virgin olive oil, for dressing
roasted slivered or flaked almonds 2 tbsp
Shrimps
medium shrimps 10 (or more if shrimps are small), cleaned
lemon juice 2 tbsp
1/3-1/2 tsp chilli flakes, optional
1 tsp sweet paprika
freshly ground sea salt and white pepper to taste
olive oil 2 tbsp, for frying
 
Method
  1. Mix up all ingredients for shrimps marinade. Put shrimps in a bowl, pour over marinade. Cover with plastic wrap and keep in a fridge at least for 1 hour.
  2. Wash and roughly cut cauliflower. Using a food processor, blitz cauliflower until breadcrumbs/couscous size.
  3. In a frying pan, heat oil and butter. Add whole baby onions and fry over medium heat until golden. Add cauliflower and garlic if using, fry for 10-15 minutes or until cauliflower is ready. Add lemon juice and season to taste. Stir in chopped herbs and olives.
  4. In a separate pan heat oil and fry shrimps for 2-3 minutes on each side over medium-high heat.
  5. Arrange cauliflower couscous on a large serving plate. Drizzle with olive oil and sprinkle with almonds. Top with shrimps.
Enjoy!

Cauliflower couscous

1 2 9