Monthly Archives: May 2014

5-star Salad

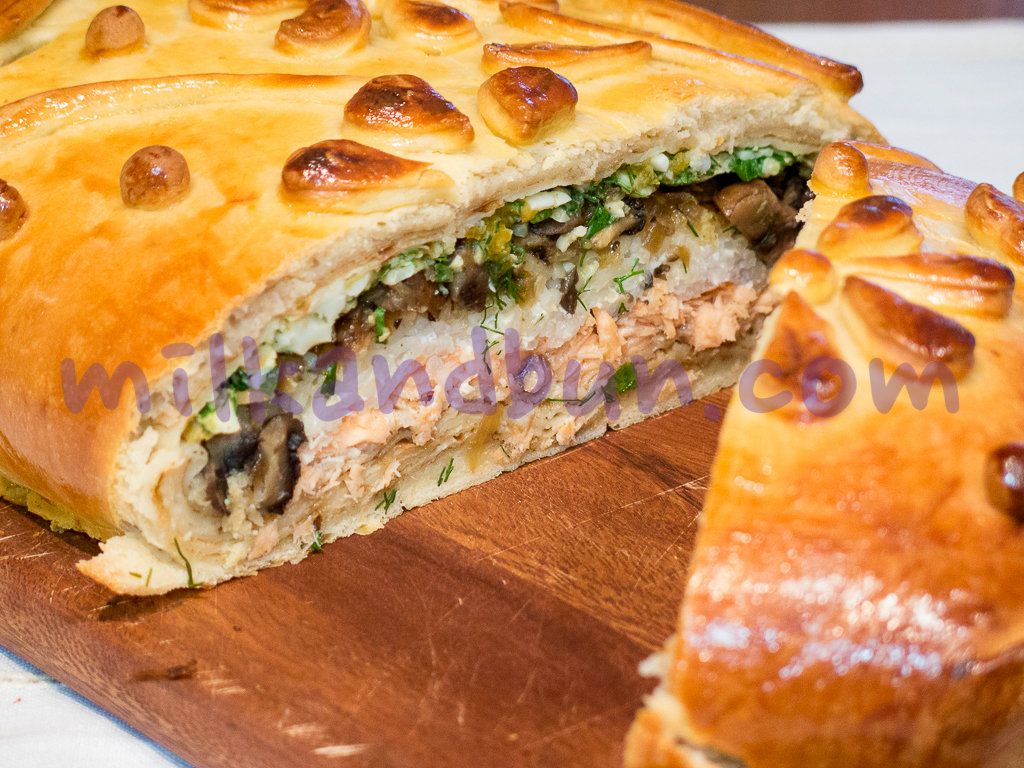
  I feel very honoured that I took the 1st place in the challenge held by Angie – Thenovicegardener.  This was my first time I won in food-blogging contest and hope not the last. Thank you all who stopped by my post and made comments about kulebyaka. The kulebyaka is so Russian and delicious pie, and I hope one of you will make it one day. 😉 Feel free to ask me if you have any questions about the kulebyaka preparation.
 Is it Friday yet? Oh, yes! That means one more party at Thenovicegardener. Does anybody would like ‘a 5-star salad’? Why 5-star, because it looks posh and the portion is so small like from a high-class restaurant. Moreover, it’s healthy and tasty.
 Actually, I made it from the cauliflower remains, when I cooked this soup. 🙂

5-star Salad

  • Servings: 1
  • Difficulty: very easy
  • Print
Ingredients:
7-9 small cauliflower florets
1 red or yellow capsicum
1 small shallot
1 clove of garlic, smashed
1-2 tsp almonds, sliced and roasted
1/4 tsp fresh thyme leaves
1/4 tsp fresh parsley or basil, chopped
1 Tbsp olive oil + 1/3 Tbsp butter
The dressing:
1/2 tsp wholegrain mustard
1/2 Tbsp extra virgin olive oil
1 tsp small capers
freshly ground sea salt and white pepper
  1. In a frying pan heat the olive oil and butter. Add the onion and cook until soften but not browned for 3-4 minutes, stirring occasionally.
  2. Add the capsicum, garlic, thyme, and sauté for 5 minutes or until the pepper is soft and browned. You can add the cauliflower along with capsicum and sauté it too, or leave it raw. Pick out and discard the garlic.
  3. In a small bowl or glass, combine all ingredients for the dressing and give it a good stir.
  4. Arrange the vegetables on a serving plate, sprinkle with almonds, parsley or basil; pour over the dressing.
Enjoy!
Salad
You can also check out these recipes, using the capsicums: the salad with chickpeas and Russian stuffed capsicums

Kulebyaka – Russian pie

 Kulebyaka or Coulibiac is an authentic Russian hot pie, which has an oblong shape and features several fillings.
The word became from old Russian verb – ‘kulebyachit’, that means to make with hands, to shape, to bend and to knead.
 Pies are always have been loved in Russia. Even famous Russian writers as N.Gogol and A.Turgenev glorified pies in their works. Various pies were always made for every holiday and festival, though it was posh royal celebration or small peasant occasion. Large pies stuffed with several ingredients were really popular, they were baked on Butterweek and Easter and served in taverns and small tea-houses, where each owner had a special recipe and baked very individual pies, different from anyone else’s, i.e. opened and closed pies, feature simple (potatoes or cabbage) or complicated (sturgeon with buckwheat) filling.Festive&Delicious Kulebyaka by milkandbun
  Only in the 17th century, the grand oblong pie, that features several fillings, was named ‘kulebyaka’. The pastry shell was usually made from the yeast dough (the recipe is below). The main distinction of the kulebyaka-pie from any other Russian pie is that the quantity of the filling should be two or three times exceeds the quantity of the pastry; the filling of grand (festive) kulebyaka is usually complicated and separated with thin pancakes.
 The most popular fillings are salmon with buckwheat, ground meat with boiled eggs and rice, cabbage with mushrooms and onions, or visiga – a spinal marrow of the sturgeon, the last one is the unusual ingredient for nowadays, but in the 17-18th centuries it was very common.
 In the 19th century, French chefs, who had worked in Russia, brought the recipe to France and adapted it to the modern cookery, thus the kulebyaka became popular pie not only in Russia. 🙂Beautiful Kulebyaka/Milkandbun
Here is my version of the festival kulebyaka.

Kulebyaka - Russian pie

The yeast dough:
3tsp/5g instant dry yeast
100ml warm milk (or warm water)
2tsp white sugar
2 eggs, at room temperature
1 tsp salt
200ml milk (or water), at room temperature
100g butter, melted
~600g all-purpose/plain/white flour
  1. In a cup, stir warm milk, sugar and yeast together. Let stand until foamy about 10 minutes.
  2. In a big bowl, crack eggs, add sugar, salt, milk, melted butter and stir together. Add sifted flour, yeast mixture and knead the dough until it’s smooth.
  3. Cover the bowl with wet cloth, put in a warm place and leave to rise for 1 hour. After the time, knead the dough again. Repeat this step one more time.
The quantity of dough is enough for kulebyaka and one big pizza.
The filling:
600g fresh salmon, cut into small cubes
100g basmati or jasmine rice, cooked
200g mushrooms, sliced and fried
1 big onion, sliced and fried
4 eggs, cooked and chopped
2+2 Tbsp finely chopped dill and parsley
salt and freshly ground black pepper
The pancakes’ recipe you can find here. You can reduce the pancakes’ batter by half, because you need approximately 9 pancakes.
The glaze:
1 egg yolk beaten with 2Tbsp milk, 1/2tsp salt and 1/2tsp sugar
Assembling:
  1. On a floured surface, roll out the dough to approximately 26cm*35cm rectangular and 6mm thick. You can roll the dough on a piece of baking parchement, thus it’ll be much easier to transfer the pie on a baking tray; moreover, you need to turn the pie upside down-the sealing should be on the bottom.
  2. Coat the rolled dough with the pancakes.
  3. Place the egg and herbs mixture lengthways down the centre of the dough.
  4. Then arrange the mushrooms and onion mixture on top.
  5. Next, arrange rice. And the last layer-salmon.
  6. Cover the filling with pancakes, shape it to make a rectangular.
  7. Then, fold the dough and seal the edges.
  8. Transfer the pie upside down to a baking tray.
  9. Decorate with pastry trimmings, and cut two slits in the top with a sharp knife.
  10. Keep for a proofing for 20 minutes. Brush the pie with egg wash.
  11. Bake in preheated 200C/400F oven for 30-35 minutes or until golden.
  12. Leave to cool slightly for 15 minutes before slicing.
  13. Serve with a glass of milk or a cup of freshly brewed tea.
Enjoy kulebyaka! 😀
 Also I’m really excited to take part in the challenge “yeast and herbs”, that Angie organized with Catherine. I almost thought to give up, because I’m using yeast very-very rare in baking, finally after many days of brain storm it dawned on me that I already baked one awesome pie, so I came up with this recipe. It only seems complicated to make, just try it once and you will see that ‘kulebyaka’ is drool worthy dish! 😀
 Moreover, are you parting at Fiesta Friday? Don’t ask me, because I do and now gonna check some great recipes, which have brought participants. Yay!
 

Cabbage casserole with farmer cheese

  White cabbage is widely used vegetable in Russia, it’s eaten raw in salads, pickled to eat during the winter and braised in various stews.
 Nowadays it’s pretty popular to eat healthy dishes, such as cauliflower soup, sautéed Brussels sprout, fish with broccoli and etc. It seems like everybody forgets about this simple beauty – the white cabbage.
Even Greek philosopher Pythagoras said: “It is a vegetable, that helps to have a courage and cheerful mood”. In ancient Russia it was a belief, that if one has a headache, they should cover their temples with cabbage leaves to release the pain.
 The below recipe is a very simple dish with a modern twist, using fresh ricotta and your favorite cheese. It could be eaten alone or as a nice side dish. A must try! 🙂
Cabbage pie-1

Cabbage casserole with farmer cheese

  • Servings: 4
  • Difficulty: not too tricky
  • Print
Adapted from Russian magazine ‘The school of gastronomy’
Ingredients:
400-500g white cabbage, thinly sliced
1 small onion, sliced
100-150g fresh homemade ricotta/cottage cheese/farmer cheese
60g any grated cheese + 1Tbsp for the top (Emmental/Gouda/Red Cheddar)
1Tbsp Parmesan cheese for the top, optionally
2 big or 3 small eggs, whites and yolks separated
40g butter
50g flour
400ml milk (preferably low fat)
2Tbsp bread crumbs, homemade
pinch of nutmeg, cumin
1Tbsp fresh chopped dill or 1tsp dried
salt, white pepper to taste
1Tbsp olive oil+1Tbsp butter for frying
 
Preparation:
1) First, make the sauce. Melt the butter in a small saucepan and turn the heat to low. Sift the flour into the butter, stirring continuously to combine them. Add the milk a little at a time. Cook for 8 minutes more, stirring continuously until the sauce becomes thicker. Remove the saucepan from the stove and let it cool.
2) Meanwhile, put olive oil, butter and onion in a pan, and fry for 4 minutes. Add cumin and fry for 1 minute more.
Add the cabbage, sprinkle with dill and stir fry for 10-15 minutes. Transfer the cabbage into big bowl.
3) Add egg yolks into the sauce, one at a time, nutmeg and combine thoroughly.
4) Pour the sauce into the cabbage, add cheese, ricotta, salt, white pepper and give it a good stir.
5) Beat egg whites with a pinch of salt until foamy, then carefully combine with cabbage mixture.
6) Grease the baking pan with butter, sprinkle with bread crumbs, add the cabbage mixture and sprinkle with cheese. Bake in preheated oven 180C/360F for 40 minutes.
7) Serve warm. Enjoy!
Cabbage pie-2

Onion cookies with cheese and chilli

 The springs has finally come bringing more sunny days, birds sing their songs, flowers are blossoming and days are becoming longer. Sun is shining and my living room now is full of light, all nature is preparing for the hot summer. I love this time of the year when it’s still comfortable to sit and walk outside in the evening, when it’s not cool but not hot yet. 
I’be been busy last days and I’m sorry for being away, days were full of life or laziness; my dearest friends came from Russia and despite they brought a huge bag of sweets, I made meringues with coconut and nuts, which were eaten immediately.
And I almost missed the awesome party, on Fridays as usual, at Angie’s place with such amazing co-hostesses as Jhuls and Selma. But ‘it’s better late than never’, isn’t it?
So, I want to serve these hot and delish onion cookies to y’all! 😀
Onion_pastry-2
 I’m pretty sure you will be absolutely amazed how well they go for a breakfast! Delicious and flavoured with chillies, which are super boosters, they will help you to wake up quicker than regular mug of coffee!
 This is a very simple recipe to make and you just have to mix the ingredients and form cookies in the round shape right on a baking sheet. Bake the onion cookies for about 20 minutes and they will be gooey, firm and bursting with incredible flavour.
 The recipe itself has undergone a number of changes since I made cookies for the first time, because there is always no limit to perfection. And the result is beautifully browned and great tasted cookies!
I’m using whether spring onion or leek, whatever is available at the moment of cooking, both are suitable and pretty good for this recipe.

Onion cookies with cheese and chilli

  • Servings: 3-4
  • Difficulty: easy
  • Print
Cookies should be served piping hot!
 
Ingredients:
130g flour, self-raising
50-60g butter, cold and cut into small cubes
3 tbsp corn flour
a good pinch of salt
1/3 tsp freshly ground black pepper
1/2 tsp crushed chilli flakes
70g grated cheese (Red Cheddar or Red Leicester)
180ml single cream or laban
1 tbsp cream cheese
2 tbsp parsley, finely chopped
1 leek or 4-5 spring onions
1/2 tbsp butter for frying
Sour cream, creme fraiche or yoghurt for garnish
 
Instructions:
  1. Preheat the oven to 200C/400F.
  2. Chop the leek or spring onions, stir fry very lightly in butter for 3-4 minutes.
  3. Combine the butter with flours, salt and peppers. 
  4. Stir in parsley, onion and cheese.
  5. Pour the cream or laban into the batter and mix well.
  6. Spoon out heaping tablespoon of batter and lay on the ungreased cookie sheet lined with parchment paper.
  7. Sprinkle with some extra chilli flakes, if desired.
  8. Bake for 17-20 minutes until golden-brown.
  9. Serve the cookies hot and optionally with sour cream.
  10. Enjoy!
Onion_pastry-3

The ruby-red treat

Who doesn’t like a glorious cherry pie? 🙂

One of the good thing about this pie is that you can use different types of pastry crusts and cherries. I like to use fresh sour cherries, but here such cherries are nowhere to be found, I’ve seen only sweet and they are overpriced. So I quiet often use frozen or canned. 
 
I made it a couple of times during the winter and I wish I would have made several more! The pie is quite easy to make and it came out amazing! Moreover, the fact that you can make the pastry ahead of time, makes the pie perfect for company or holiday parties.
 
Don’t forget that cherries should be pitted! The sugar amount for the filling varies depending on how sweet your cherries, adjust it to suit your personal preferences.
Cherry_pie-2

The ruby-red Cherry Pie


Ingredients (for 13 cm/5 inch pie pan):
Short crust pastry:
190g plain flour
100g butter, chilled and cut into small cubes
1/2 tbsp white sugar
a pinch of salt
30-40 ml cold water
 
Cherry filling:
300-400ml pitted fresh or canned cherries
1-2 tbsp white sugar, if needed
1 tsp corn starch
1 tbsp lemon juice
1/2 tbsp cherry liquor or brandy (optionally)
1/2 tbsp fine semolina
 
Glazing:
1 egg yolk+ 1tsp milk 
1/2 Tbsp granulated white or brown sugar
 
Preparation:
  1. Place all ingredients for the filling in a bowl, and gently combine. If you’re using fresh cherries, let them stand for 20 minutes, then toss it again.
  2. Combine the flour, butter, sugar and salt until coarse meal. Pour water slowly and incorporate gently until the dough begins to hold together. Roll into two ball, cover with plastic wrap and refrigerate until ready to use (at least 30 minutes). The short crust pastry can be kept in the fridge for a week! I suggest to double the quantity of pastry and make it ahead, thus you can prepare a big pie for the family or several  individual pies during the week.
  3. Roll one portion of dough into 22 cm circle and transfer to the pie pan. Keep it in the fridge, covered with plastic wrap, while you roll out the top of the pie crust. 
  4. Roll the second pastry ball into smaller circle – 18-19 cm. Use a knife to cut vents into the top crust, so the steam has a place to escape while the pie is cooking. Refrigerate until ready to use.
  5. Preheat oven to 180C/360F.
  6. Remove the crusts from the fridge and let it sit at room temperature for 5-7 minutes so they have time to soften.
  7. Sprinkle the bottom pastry with semolina, and fill the pie.
  8. Lightly brush the rim with egg wash. Top it with second crust.
  9. Brush the entire surface with egg wash, sprinkle with granulated sugar.
  10. Bake the pie for about 35-40 minutes until the crust is golden brown and the cherry juices are beginning to bubble. Let the pie cool on a rack for sometime.
  11. ENJOY! 😀