Kasha means porridge. One Russian proverb says “Bread and Porridge is our food”. A pot with a porridge and bread were the main food on a table many years back. A large varieties of cereals are produced in Russia, but the popular and loved one has been the buckweat.
According to old Russian tradition, during the wedding a bridegroom and a bride had to cook a porridge together. If they could cooked a good, tasty porridge that meant they could get on with each other. A porridge was cooked for many occasions like a wedding or Christmas feast, birth or funeral repast. Sometimes a feast was called ‘kasha’. Every hostess had a personal recipe of porridge, which she kept in a secret.
In Russian cuisine a porridge is divided into 3 groups by it’s consistency: liquid (eaten as a soup), oozy (usually for children) and crumbly (the tastiest one). The consistency depends on a quantity of water or milk, in which porridge was cooked. 

Millet porridge with butter or lard added was the common meal for Russian labors, who had worked in fields. It’s can be eaten sweet (with sugar, honey, dried fruits) or savoury (with onion, garlic, mushrooms), as a main dish or garnish.
Moreover, millet is rich in calcium, B vitamins, iron, potassium, and contain no gluten.
We need:
- pumpkin
- millet – 1 cup
- water – 1/2 cup
- milk – 1 cup
- a knob of butter
- few dried apricots
- raisins
- sugar – 1Tbsp
- a pinch of salt
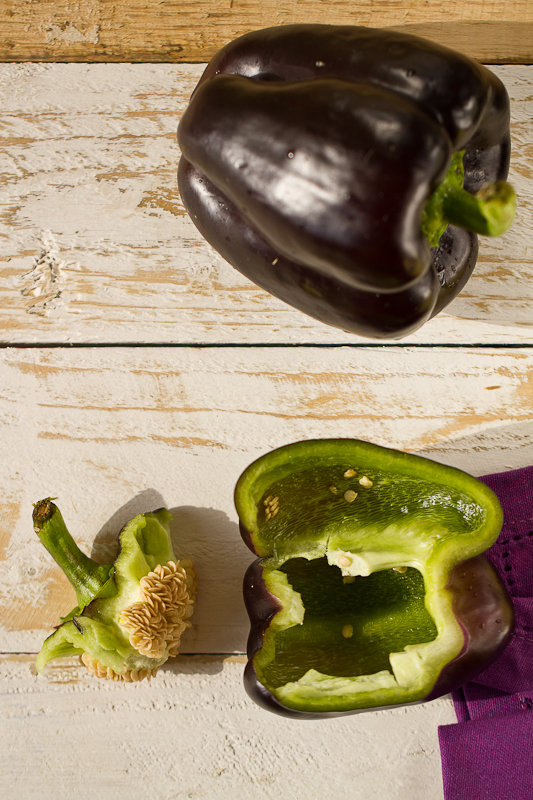
Take a pumpkin.
Cut the lid and set aside. Clean all seeds out.
Put a knob of butter on the pumpkin bottom.
Wash millet thoroughly under running tab water. Mix with raisins and sliced dried apricots.
Put the cereal mixture in the pumpkin. Add a pinch of salt and some sugar to taste. Pour the milk and water, cover with the lid.
Bake for 1-2 hours.
Open the lid.
Tasty millet porridge in pumpkin pot is ready!
Serve with honey.

P.S. For 1 cup millet take 1 cup milk+1/2 cup water. Sub millet with rice.
P.P.S. Don’t throw away seeds. Sprinkle over some sea salt and smoked paprika. Add olive oil and bake on a baking paper along with the pumpkin.