Tag Archives: homemade

Coconut Cheesecake (flourless)

  Hello guys! How are you doing these crazy days? Hope you stay home, safe and healthy. Sometimes I forget about this coronavirus situation, that I stay home not because it’s quarantine and lockdown but because I decided to bake something and spend time home…  I’d love to drive somewhere and discover a new coffee shop and sit there over a cup of aromatic flat white… I miss the beach, I miss paddling in the sea I want to go to the nearest supermarket without wearing face mask and gloves, and buy a freshly baked bun there and eat it on the way back I want to go to the park with my little one and run and play with a ball there… I miss everything, I miss the world. Sigh.
  I hope this will end soon somehow, and we will able to do whatever we enjoy doing.
Coconut_cheesecake
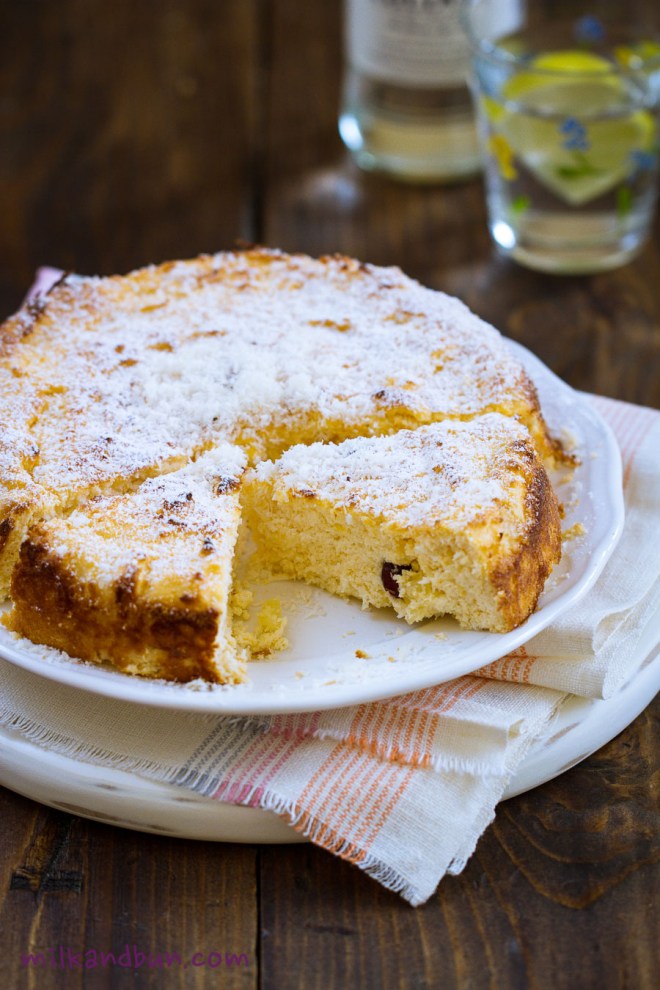
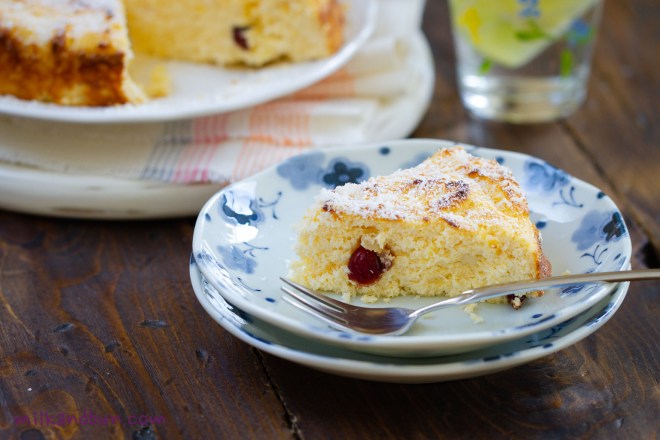
A few months ago I’d wrote that this cake with sweet dried cherries will be tastier… but today, today everything is different. I know it’s difficult for someone to come by to Russian tvorog but if you’re lucky to find pure one – use it, better 5-9%. I make tvorog myself: boil a large quantity of plain yogurt (or 3%-kefir/soured milk). As another great alternative for tvorog, Bulgarian and Cypriot cottage cheese works well, or Ukrainian is much the same.
Coconut_cheesecake (flourless)
Moreover, if you don’t have enough coconut flakes, keep them to sprinkle the cake top, or even don’t use it at all, and use plain white flour in the cake batter. Now you can see – that this cake recipe is very simple and can be adopted very easily. Don’t miss this incredible and tasty cake! Hope you will make it soon. Stay safe guys!
Coconut_cheesecake-(no flour)

Coconut Cheesecake (flourless)

  • Servings: 4-5
  • Difficulty: very easy
  • Print
*dried cranberries are also good
What you’ll need
400g tvorog/cottage cheese
70g white sugar
4 egg yolks
2 tbsp dried cherries, optional*
1-2 tbsp dried pineapple cubes, optional*
100g unsweetened coconut flakes
4 egg whites
a pinch of salt
How to make it
  1. Whisk tvorog with sugar and egg yolks.
  2. Fold in dried fruits, if using, and coconut flakes.
  3. In a separate bowl, slightly beat egg whites with a pinch of salt until soft peaks. Carefully fold into batter.
  4. Line the baking tin with paper, grease and pour in the batter.
  5. Bake in preheated 180C oven for 40 minutes.
  6. Allow to cool in the tin for some time and transfer to the serving plate. Sprinkle with some coconut flakes, if desired.
Enjoy!

Homemade Aromatic Breadcrumbs

 I’m sure most of you eating bread almost every day. And I guess you have pretty much leftovers, which going to be mouldy or dry out. My decision is not to buy or eat less bread, is to make your own homemade breadcrumbs! Of course, you can make a bread pudding or French toasts with the leftover bread, but I bet you do not always have a time to prepare it in the morning. Easy to follow steps allow you to make aromatic breadcrumbs, which is extremely good and more tasty than store-bought, and you know all ingredients you’ve used. Include different types of bread and play with herbs, I prefer rosemary, thyme, basil, sage. Breadcrumbs should be store in an air-tight container, or even in the freezer. When you need some, just spoon out the amount of breadcrumbs you need.
 I make a simple pasta topped with breadcrumbs, or stuffed chicken breasts. You can also make a delicious snack – baked slices of zucchini and/or eggplants. For that you need to combine breadcrumbs with dried or minced garlic, chopped fresh parsley and thyme, fresh ground pepper, olive oil, grated parmesan, then top each slice of veggie with the mixture and bake. 🙂
 I hope you will never buy commercial breadcrumbs again, or at least you will try. 😉
Homemade Aromatic Breadcrumbs

Homemade Aromatic Breadcrumbs

 If you have only few leftover bread slices, cut them into cubes, put into a freezer bag and place in the fridge. When you’ve got more leftovers, keep adding bread pieces to the bag until you have enough quantity. Then follow the recipe steps.
 
Ingredients
one/two-days old bread or any leftovers
1 tsp each: rosemary, basil, thyme
  • Cut bread into small pieces with a knife, then arrange on a baking tray. Bake in preheated 160-170C/150C-fan oven for 20-30 minutes or until bread pieces is golden and crispy.
  • Put bread pieces into a food processor along with dried herbs and blend to a small crumbs. You can also put bread pieces into a plastic bag and smash it with a kitchen mallet.
  • Put into a glass jar/container and cover tightly. Or put breadcrumbs into a freezer bag and keep in the freezer.

Cherry Strudel with nuts

  First time I have tried strudel at home. It was a frosty winter day, I was at home finishing a homework after school, when my mother came and told me she’d got a new dessert recipe! I was so excited, because it has been a habit in our family, almost every evening we had a tea with some freshly-baked pies, buns or danishes whether it were homemade or store-bought.. Easy to guess, it was a strudel recipe. At that time of the year we could make only apple-raisin filling; compare to today it was impossible to buy even frozen cherries, only if you hadn’t froze it by yourself last summer. So, we had some nice apples, which were picked from garden and kept in a cellar, raisins and walnuts; the recipe worked so good, the pastry turned thin and smooth.. and we liked the result – new, mysterious and so delicious strudel! 🙂 Believe me or not, since then I’m using exactly the same pastry recipe and it works! 🙂

 Certainly, you can cheat and use filo pastry, though you should try to make the pastry from scratch at least once, it only sounds complicated. Most of you know, that nothing could beat the homemade pastry! 😉
Cherry Strudel
 Do you know, that first strudel recipe is dating back to 1696; strudel legend says that the Austrian Emperor’s chef  was perfectionist, he even made an order that strudel pastry should be so thin that you could read a love letter through it!
Scrumptious Strudel

Cherry Strudel with nuts

Ingredients
Pastry:
250g all-purpose white flour
1 egg
50g melted butter
125ml warm water
a pinch of salt
Filling:
700-900g pitted cherries
3-5 Tbsp caster sugar
4 Tbsp finely crushed almonds or breadcrumbs
3 Tbsp walnuts, coarsely chopped
3 Tbsp hazelnuts, coarsely chopped
40g currants (black)
40g golden raisins
3 Tbsp cognac/brandy/rum
 
40g melted butter, for glazing
1-2 Tbsp icing sugar, for serving
 
Preparation
  1. The pastry. Sift flour on to a clean surface, add salt, and make a  well in the middle. Slightly beat an egg with water and butter, add the mixture into flour. Knead the dough for 10 minutes, time to time punch it down and throw until it becomes elastic and smooth. Wrap it in clingfilm and leave it at room temperature for 30 minutes.
  2. Preheat the oven 200C/400F. Line the baking tray with baking paper, grease it with some melted butter or oil.
  3. The filling. In a cup or small bowl, put all washed raisins and cover with cognac; soak for 15 minutes, then pour out remaining cognac. Cut cherries into halves, you may keep some whole.
  4. The pastry. Dust a workspace with flour and roll out the pastry into rectangle as thinly as possible. You can place wet and floured tea-towel, and do it on it. When you can’t roll the pastry any more, begin stretching it using your hands – place back side of your hands under the pastry and stretch it. Keep on going until it is very thin or you can see pattern of the tea-towle through it.
  5. Brush the rolled dough with melted butter. Sprinkle with crushed almonds, leave en edge 3cm uncovered. If using breadcrumbs, brown them in some butter until golden-brown.
  6. Spread cherries, and sprinkle with sugar. Adjust amount of sugar, depending on your taste.
  7. Scatter raisins and remaining nuts on top.
  8. Fold uncovered edges in, then roll up the pastry into a sausage shape. 
  9. Gently put the strudel on the baking tray, brush with melted butter. Bake for 35-45 minutes until the pastry is golden.
  10. Allow to cool slightly before serving, dust with icing sugar. Serve while it’s still warm with vanilla ice cream or sauce.
 For the vanilla sauce, in a medium pan warm 125ml milk and vanilla bean (don’t allow to boil); add 1 beaten egg yolk along with 1Tbsp caster sugar and 1 tsp cornmeal into pan; stirring constantly, cook on a medium heat for 9-12 minutes, until the sauce thickens a bit. Let it slightly cool and serve with strudel.
Absolutely tasty!
Let’s party, lovely bloggers! Let’s drink (ha, only lemonade so far..) and eat all those tasty dishes, that we’ve brought at FF! 🙂

Breakfast. Russian Salted Salmon.

   What homemade breakfast is enjoyable for you? For me it is a sandwich with homemade salted salmon. Thin slices of salmon on a piece of Russian rye bread. May be some butter, chopped dill.. No words! It sounds so delicious, so amazing! I’m already hungry! 😀
   You can also add a thin slice of lemon or lime. The citrus really comes through, but doesn’t overpower the delicate taste of cured salmon. Such breakfast would be a great start to the day for sure!
   Don’t forget to prepare a cup of fresh coffee or tea. Now you can enjoy the incredibly tasty breakfast!
     
   We do like a red fish in Russia!  But during Imperial times in Russia not only fish with red meat were called “red”. Sturgeon,  beluga (hausen) and sterlet were served for imperial dinners as “red fish”. List of red fishes was named not by the color of the meat or by the breed, but by excellent and tender taste, a certain size, and the prestige! It’s fishing was very difficult and sometimes dangerous. For example, beluga could weight up to 200-300 kg and could easily sinks the fishing boat. In 1827 beluga was fished with weight around 1500 kg!!! Siberian sturgeon got the title “The king fish” for it’s strength and size. So such dainty fishes been expensive, not everybody could buy it. Only for imperial family, noblemen and gourmets. Fishes with red meat (salmon) were more ordinary and often were made salty for long storage.
   Popular and widely-sold types of red fish in Russian are chum salmon and pink or hunchback salmon (they’re not very expensive), salmon and  trout are more expensive species but definitely more tastier fishes. Nowadays, it’s possible to buy already salted salmon in supermarkets but many Russian women prefer to buy a whole fish (often it’s sold frozen) and cure it themselves. The weather in Russian is cold most of the time, so fish’s head, tail and fins go well into soups and chowders, such comforting and nourishing meal can easily warms you up.
 Cured salmon can be eaten as is, or on a slice of your favourite bread. It is a delicious appetizer, which accompanies vodka and other strong drinks. More pure vodka – more salmon should be eaten, it helps to reduce an alcoholic intoxication.
  I’m sure your guests would be glad to taste Russian salted salmon and interested in the recipe. Shall we keep it in a secret? Can’t say for you, but I’ll show you how to prepare it soon (you can find the recipe by clicking here).
  Stay healthy!

Homemade Fresh Ricotta

Very useful recipe for home-made Ricotta!  The only thing I need is to find a time to cook it.

Ingredients:

4 cups (960 ml) whole milk
1 cup (250ml) heavy cream
3/4 (180ml) cup buttermilk
1/2 teaspoon sea salt

Directions:

1. Place all ingredients in a 2 quart saucepan. Slowly bring to a boil over medium to medium-high heat, until curds begin to form 88-93 degrees C (190 to 200 degrees F.)

2. Remove from heat and pour into a cheesecloth-lined fine mesh sieve set over a large bowl. Let drain for 15 minutes. Gather cloth around the ricotta and gently squeeze out a little more liquid. Don’t squeeze it dry or you’ll end up with dry ricotta… leave some moisture in there.

3. Place fresh ricotta in airtight container & refrigerate for up to 2 days.

Recipe for Fresh Ricotta | RecipeGirl.com

As I have no idea where to get buttermilk and what really is it so I’ve found a recipe from net. I believe it can be helpful for someone else.

Ingredients:

Heavy cream

Preparation:

1. Fill a jar halfway with heavy cream. Then, screw the lid on firmly (a canning jar works well for this purpose).

2. Start shaking the jar back and forth. After several minutes, the cream will thicken and turn into whipped cream. Keep shaking until the whipped cream is replaced with a yellow glob (butter) and a separate liquid (buttermilk).

3. Pour the buttermilk out of the jar, and use it in any recipe that calls for buttermilk.

To Use the Butter: Knead it under cold water for a couple minutes to remove any remaining buttermilk (it will spoil very quickly, if you don’t). Then, salt (if desired), and store in the refrigerator until you’re ready to use it.