Tag Archives: healthy

Roast quail for St.Valentine Day

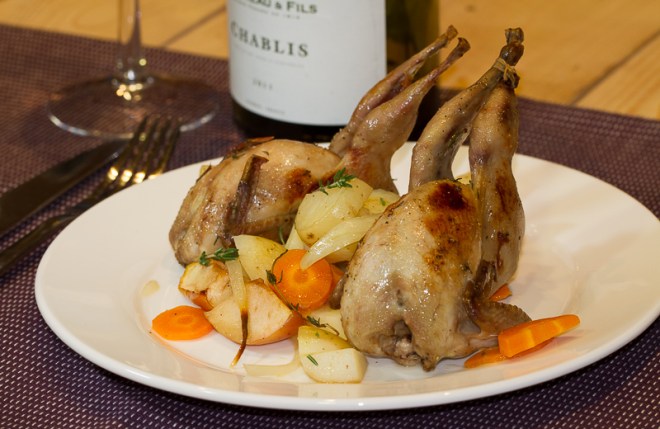
 Quail may be tiny birds but they pack a real flavor punch. Perfect for Valentine’s Day meal.

 There’s something adorable about presenting your Valentine with their own whole bird. The easiest way (and messy) to eat a small quails is with your fingers 🙂 or you can carve it as turkey.
Quail(Click on the photo to see it in a larger size)
 Serve one quail per person as a starter or two as a main course.
 
Ingredients
4 whole quails
4 medium potatoes
2 carrots
2 medium onions
1 small bunch thyme
6-8 juniper berries
2 tbsp runny honey
2+2 tbsp olive oil 
salt, pepper
 
Method
  1. If you’ve got frozen quail, defrost it overnight in the refrigerator.
  2. Take the quail out of the fridge 1 hour before cooking. Wipe the outside of the bird and inside the cavity, using kitchen paper.
  3. Season inside with salt&pepper, put in sprig of thyme and one juniper berry. Tie the legs together with string (optionally).
  4. Season birds with salt&pepper and thyme, brush with honey and 2 tbsp olive oil.
  5. Preheat oven to 200C. Put thinly sliced potatoes, carrots, onions, thyme and juniper berries into a roasting tin. Sprinkle with salt&pepper, drizzle with olive oil. Cook for 15-20 minutes.
  6. Sit the quail on top and roast for 25 minutes more.
 
Enjoy!
 

Russian pryaniki – gignebread

  Today is Christmas in Russia. I wish wonderful and magical day to all Orthodox Christians!
Pryaniki_snowflakes

 Pryaniki were ones of the favorite treats in Rus’ (old name of Russia). The name was given for it’s spicy aroma and taste. They are similar to gingerbread cookies, but often made more thick.

 Pryanik was the symbol of holiday, because ingredients weren’t cheap and used daily. It’s been baked for the Christmas, Easter, weddings and birthdays. There were quite a lot ceremonies and traditions about pryaniki.
 
 In 9th century, first pryaniki were called “honey bread”, they were baked from rye flour with honey and berry juice, honey contained the half of all mixture. Later wild flowers and spices were added in a pastry.
 In 7-8th centuries, when exotic spices were brought from India and Middle East to Russia, pryanik was named “pryanik”. Spices for pryaniki were called “dry perfume”, among which black pepper, orange and lemon zest, mint, vanilla, cinnamon, ginger, anise and clove were most used and favorite.
 In 17-19th centuries, baking of pryaniki was widely-spread craft. In every area people baked their special pryaniki according to traditional recipes; preparation’s secrets were passed on from one generation to another.
 
Ingridients:
For  the pastry:
100-120 ml honey
300g flour
1 tbsp butter
1 egg
1/3 tsp baking soda
1/4 tsp spice mix*
50ml water
1 tbsp cognac, brandy or vodka (optionally)
 
For the frosting:
1 egg white
150g icing sugar (powedered sugar)
 
*Spice mix:
1/3 tsp powdered coriander
1/3 tsp cinnamon
1/6 tsp nutmeg
a pinch of cardamom
a pinch of clove
a pinch of allspice
 
Honey and water heat in a pot (turn the heat off before the mixture begin to simmer). Take the pot away from the heat, add half of the flour (sifted) and mix intensively until smooth.
Cool the mixture until room temperature.
Then add the egg, cognac, spices, soda and the remaining sifted flour. Mix the pastry well during 15 minutes; it should be soft and tender.
Roll out the pastry in 5-6 mm/2 inch sheet and cut out any shape you like.
Bake in preheated 200C/400F oven for 15-18 minutes.
 
While the pryaniki are cooling, prepare the frosting. Beat well egg white, add sugar and beat again untill smooth. Put the ready frosting in a bag and decorate the pryaniki.
 
Enjoy with a cup of hot tea or a glass of milk. 🙂
 
 Keep the pryaniki in a box, it can be stored during long time.
Pryaniki_ornament

Slow-cooked beef with fruits

  In Russian language, we have one word “tomlenie”, which is similar to the word “stewing”, but has a significant distinction. Tomlenie is a slow-cooking process of meat, fish or vegetables in Russian petch (oven/stove, have a look at the pictures of traditional Russian petch here and here).  
  Nowadays traditional Russian ovens can be found only in out-of-the-way places (villages and provinces, located in the remotest depths of the country).
  It’s considered that, slow-cooking in the common oven is close to the “tomlenie” process, but the real taste and aroma of dishes prepared in Russian petch unfortunately couldn’t be done anywhere else.

Slow-cooked meat

Let’s try to prepare the closest dish.
First of all, we need a clay pot with a lid. 
Be patient! Stewing will take several hours.
Don’t worry! During this time you don’t need to check or mix the dish every 10-20 minutes, thus you can have a break and watch your favorite movie, and even prepare a side dish. 🙂

Beef with fruits

If you don’t have clay pot-use casserole.
If you don’t have a lid -cover the pot with foil.
Replace cherries with cranberries.
Omit the sugar.
Spice the meat with 1/3 tsp of crushed cardamom, it brings a nice interesting note. 
You can add 2-3 tbsp of dry red wine for the better taste (after the frying meat).
Ingredients to feed 4 people:
Beef, cut into 2-3cm cubes – 700g/1lb
Golden onion – 1 big, sliced
Pitted prunes – 150g/5 oz
Cherry fresh or frozen – 150g/5 oz
Sunflower or olive oil for frying- 1 tbsp
Cinnamon – 1/2 tsp
Sugar – 1 tbsp
Bay leaves – 2
Whole black peppercorns – 8-10
Salt, pepper – to taste
some parsley, chopped
 
Method:
  • Heat the oil in a frying pan and fry the onion for 5-7 minutes, add beef cubes and fry until slightly browned.
  • Sprinkle the meat with sugar and cinnamon.
  • Put the meat in a clay pot, add boiling water (just to cover the meat), bay leaves and peppercorns. Season with salt and pepper. 
  • Don’t forget to close the pot with a lid! 🙂
  • Transfer to a preheated oven, 200C/400F, for 2 hours.
  • Check the quantity of the liquid, and add some more water  – if desired (the meat always should be in the broth).
  • Reduce temperature to 180C/380F and return to the oven for a further 1 hour.
  • Add prunes and cherries (no need to defrost), check the seasoning and return again to the oven for 30 minutes.
  • Switch the oven off and leave the pot in it (until the oven is still warm).
  • Sprinkle with fresh parsley.
 
The good garnish to such meat is a buckwheat porridge, mashed or boiled potatoes. It could be served with broth; in a clay pot or on a serving plate.
Enjoy the holiday dinner! 🙂
 

Stuffed capsicums. Russian recipe.

First of all, guys, have you seen Jamie Oliver’s live foodtube show yesterday? I’m a huge fan of him, he is so inspiring person! It started 12:30am Dubai time and today has been working day. I’ve honestly tried to watch it, but after half an hour I fell asleep:) Going to watch it today.

There are a large variety of fillings that are used for stuffed capsicums worldwide.

The most widely known in Russia is ground pork with rice. However, the concept has mutated to suit up-to-date needs, and peppers are filled with couscous, wild rice, cheese and etc.

Peppers_3

You need around 60-70g of the filling per capsicum.
 
8-10 medium-sized capsicums
500g ground pork/beef or 250g pork+250g beef (I used beef)
100-150g rice, short-grain preferably 
2 carrots, shredded
1 big onion, finely chopped
200g sour cream
100g tomato paste
200-400ml lukewarm water, I prefer veg stock
sunflower or olive oil for frying
salt, black pepper
small bunch of dill or parsley, chopped (optionally)


Wash the rice thoroughly, cook in 100ml of water until semi-done (around 7-8 minutes).

In a small pan over medium heat, fry carrots and onions until tender and they’ve get golden color.

Meanwhile, wash capsicums, cut the tops off each pepper and remove seeds. If peppers do not stand up straight, slice a little (!) off the bottom of the pepper to level it out.

Peppers_1Peppers_2Mix meat, cooked rice and 1/2 of veggies together (if you don’t like onion and carrot in filling, escape this step). Add salt, black pepper to taste. Fill the capsicums tightly and place in a baking dish.

In a bowl combine sour cream, tomato paste and the remaining 1/2 veggies together.

Pour the sauce in a large deep dish. Place the stuffed capsicums in.

Pour the stock or water slightly below the brim of the capsicums.

Close the dish with a lid, bring to boil, reduce heat and simmer on a lower-medium heat for 35-45 minutes.

Serve with the sauce, in which peppers were cooked, or sour cream.

Sprinkle over some fresh dill or parsley.

Peppers_4

Yummy! 🙂

Purple peppers and chickpeas!

This summer I’ve been making lots of salads.

It’s still extremely hot in Dubai and one more salad has been done:)

black pepper-4

    I found these beautiful capsicums at a store, grown by farmers in the Netherlands. They’re absolutely marvellous, aren’t they?

black pepper-1

Never seen such deep purple, blackish color of bell peppers. 🙂 They are green inside and have got the same taste as green ones.

black pepper-2

So, about the salad. One of the main ingredients are capsicums, as you could guess 😉

I promise, the salad won’t leave you hungry.  Chickpeas in it are high in protein! Usually I make it ahead (before fitness class, for example, after I’m so hungry!) so it has plenty of time to marinate.

We need:

  • 1 can chickpeas (drained)
  • 2 big capsicums
  • 100 g feta cheese
  • juice of  ½ lemon + zest of ¼ lemon
  • extra virgin olive oil (for frying and dressing)
  • 2-3 sprigs of fresh thyme (or dried one is good as well)
  • 1 tsp cumin
  • fresh mint or/and parsley

black pepper-3

Heat the olive oil with thyme and cumin just for 1 minute, add shredded capsicums, toss and stir-fry until they become soft. My purple peppers turned into greenish color 😀

In a large bowl, combine chickpeas, capsicums, feta cheese and lemon zest. Toss to combine.  Pour 2 tbsp olive olive and lemon juice over the mixture.

Add some fresh mint and parsley; season to taste with grounded black pepper.

You can serve it immediately, but I heartily recommend to leave it  for 30-60 minutes to marinate.

Enjoy!

black pepper-5