Tag Archives: easy recipe

Kisel – Russian sweet drink

 Kisel – is a well-known and popular sweet drink in Russia. This healthy drink contains berries or fruits, also sugar and water, and thickened with a potato starch. Kisel can be served cold or hot, sometimes it’s poured over ‘cottage cheese bake’ or ‘syrniki’. The kisel thickness can vary depending on how much potato starch is used; the thickest version does look like a mousse or jelly and can be eaten with a spoon, however the thin kisel is the most common version in Russia and usually consumed as a drink.Kisel-Russian sweet drink

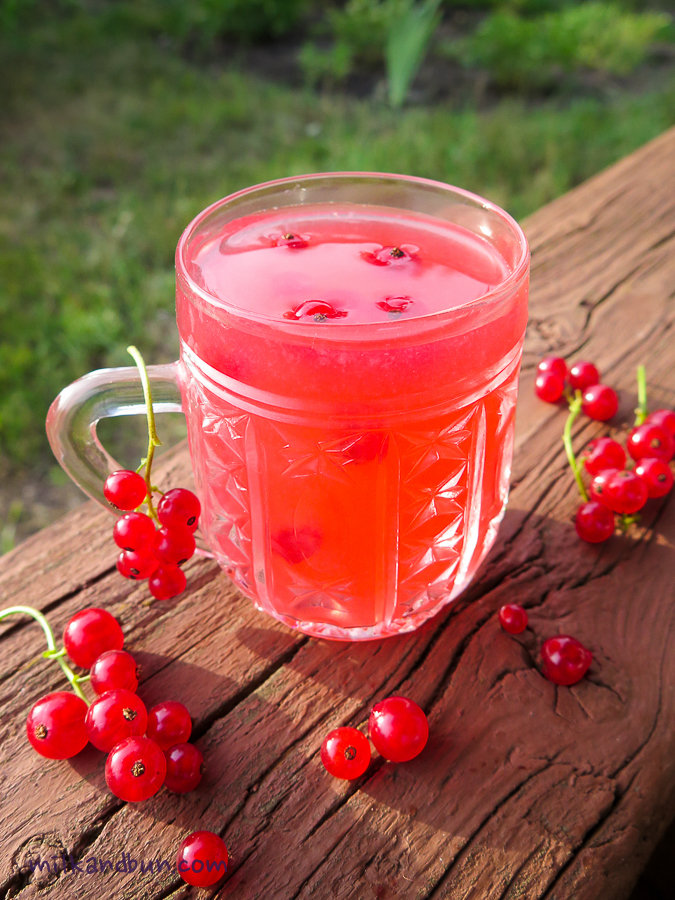
  Kisel is generally made with fresh berries or fruits (red currants, cherries, cranberries, apples – are most common flavors which are widely available in Russia), but during the winter sweet jams or frozen berries are used to make it. The very first Russian kisels were thick and made with oat, wheat, rye or pea flours, and it dates back over one thousand years.
 Nowadays there are lots of instant kisel mixes, which you can find at Russian stores, but I do assure you that to make you own kisel is very easy and definitely better and tastier. I made mine with fresh red currants; you can use any fresh or frozen berries. Enjoy!Russian red currant kisel (drink)

Kisel - Russian sweet drink

  • Servings: 6-8
  • Difficulty: easy
  • Print
To make thick kisel add more starch.
Ingredients
200-300g fresh red currants, rinsed
5-7 tbsp sugar (or more, depends on your taste)
2l water
3 tbsp potato starch (or cornstarch)
Method
  • Keep aside some red currats. Strain the rest through a sieve into a saucepan. Add water, sugar and bring to boil. Reduce the heat, taste and adjust the sweetness.
  • In a small cup, mix starch with few tablespoons of cold water. Add it to the saucepan along with red currants that you’ve kept. Give it a good stir and turn off the heat.
  • Pour in a glasses or cups. Serve warm or cold. Enjoy!

Salad “Tashkent”

 Tashkent is the capital of Uzbekistan, one of the former USSR countries. According to one version this salad was created in Moscow during USSR times, when Soviet government set the task to popularize the various national cuisines of the Soviet Union. Due to a very limited availability of the ingredients in most parts of the USSR, Soviet cuisine can be characterized as simple. So, the salad also had to be simple, tasty and nourishing. Another version says that the salad was created by chef of the “Tashkent” restaurant in Moscow, where it also was served for the first time.
 Main ingredients are boiled beef and green radish, sounds simple but believe me the salad will be very tasty! Unhealthy side is dressing, because it’s mayonnaise. So, I suggest to make and eat this salad during weekend, or serve it for a special occasion and everyone will certainly be in awe. 😉 You can also substitute mayo with sour cream, but the taste will be slightly different. Another option for dressing is flavorful sunflower oil, that sometimes mixed with a teaspoon of vinegar. Chose the option and enjoy the salad! 
Tashkent Salad
  • Servings: 4
  • Difficulty: easy
  • Print
Ingredients 
400-500g beef fillet
800-900g green radish (I used daikon/Chinese white radish)
4 eggs, hard-boiled
1 large brown onion
2 tbsp sunflower oil for frying
100-150g mayonnaise for dressing (or sour cream/sunflower oil)
fresh chopped coriander or parsely for serving, optional
pomegranate seeds for serving, optional
salt, black pepper to taste
 
Preparation
  1. In a large pan, put the raw meat, cover with cold water, season with salt. Bring to boil, remove the foam, reduce the heat to medium, and simmer for 50-60 minutes. Optionally, you can add few peppercorns, bay leaf, small onion to get aromatic stock which you can use later. Cool the meat, then cut into julienne (thin strips).
  2. Cut eggs into thin strips. Optionally, instead of cutting eggs into strips you can cut them into 4 wedges and garnish the salad.
  3. Cut radish into julienne. Sprinkle radish with salt and let stand for 15 minutes, drain the liquid. If you are using green radish, cover it with cold water and leave for 1 hour to get rid of bitterness; then drain the water.
  4. Thinly slice the onion into half-moon. Heat the oil and fry the onion until golden-brown.
  5. In a large serving bowl, mix radish with onion, add beef, season with salt and pepper. Carefully stir in eggs and dress with mayonnaise. Garnish with coriander/parsley and pomegranate seeds.

Sharing at lovely Fiesta Friday party by Angie, and co-hosts this time Jhuls and Laurie.

Sharlotka

 Sharlotka – that’s how one of the popular apple cake in Russia called. I believe this cake is so widely-known that there is no a man in Russian who wouldn’t heard about it. When I was a little girl I ate sharlotka so many times that I hardly can count, I ate it at my home, at friends’ home.. And I still love it! It’s one of the easiest recipe that always turns out great!
There are many varieties of Charlotte dessert. Russian ‘charlotte’ was created by French chef Marie-Antoine Careme who worked for Russian Tsar Alexander I in 19th century in London. Believed that the dessert took its name from Queen Charlotte, wife of George III of the Intied Kingdom, who loved apples. For this dessert the bottom of baking mold was lined with sponge cake or savoiardi biscuits, then filled with Bavarian and whipped cream, and completely cooled. Originally the dessert was named ‘charlotte a la parisienne’ but lately became popular under the name ‘charlotte russe’ or simply ‘Sharlotka’.
In Soviet times the recipe was modified and became sponge cake with apples. Nowadays, the cake continues to be liked and cooked by many Russian women, including me. 🙂 It’s also a kind of ‘rescue’ sweets that you can prepare in minutes when your friends came around unexpectedly. Below recipe is my mother’s recipe, I haven’t change a word in it and the cake turns out perfect every time, I think it will make my mummy proud and happy. ❤Sharlotka

Sharlotka

  • Servings: 6
  • Difficulty: easy
  • Print

You can also roughly chop apples, stir into the batter and then bake.
I used 20cm/8inch cake spring-form.
Ingredients
2-3 large apples, peeled, cored and sliced
3 eggs, at room temperature (better to use large eggs)
80g white sugar
110g plain flour
2 tbsp water
1/2 tsp b.soda
1 tsp lemon juice or vinegar
a pinch of salt
icing sugar for dusting, optional
Preparation method
  1. In a large mixing bowl, add 3 egg yolks, water and sugar. Put baking soda in a tablespoon, pour in lemon juice or vinegar, mix with a teaspoon to dissolve it, then pour into the egg mixture. Beat egg mixture until light and creamy.
  2. In another bowl, beat egg whites with a pinch of salt until soft but steady peaks.
  3. Gradually mix egg whites into egg yolk mixture. Don’t stir too much.
  4. Gradually sift and fold in the flour.
  5. Grease and dust with flour the baking form. Gently spread half of the batter into the form. Arrange apple slices. Pour in the rest batter, evenly spread.
  6. Bake in preheated 180C oven for 30 minutes.
  7. Sprinkle with icing sugar, if desired. Serve warm with a cup of freshly-brewed tea.
You can keep the cake in a box or on a plate covered with foil in the fridge up to 3 days.
Enjoy!

Sharlotka- Russian apple cake

Sharing this tasty cake with Fiesta Friday and all lovely bloggers who is enjoying it!

Chicken Liver Pâté

 Hey guys! To say the last few weeks of my life have been filled with sport, beach and meeting with friends, so I hadn’t been posting regularly and commenting on your lovely blogs, but I will resume blogging and posting more often. 🙂 And I want to share with you a simple but super delicious recipe –  chicken liver pate! The pate is very quick and easy to make, and require only a few ingredients. Another advantage is a low cost of chicken livers. Pureeing the cooked livers along with butter and a little cognac or brandy transforms the plain part of chicken into something magnificent! It’s a great breakfast on a slice of toasted bread or can be a nice appetizer topped with a cornichon or little pickled onion. 🙂Chicken liver pate

Chicken Liver Pâté

  • Servings: >6
  • Difficulty: easy
  • Print
If cooking for children, omit the cognac.
Ingredients
1 large onion
1 medium carrot
20g butter
500g chicken liver, cleaned
1+1 tbsp cognac (or brandy/whiskey)
1/2 tsp dried thyme or 1-2 tsp fresh leaves
a pinch of freshly grated nutmeg
50ml water or chicken stock
100ml cream  (12-15%)
50-60g butter, at room temperature
sea salt to taste
freshly grated black and white pepper to taste
Top
40-50g butter
 
Preparation
  1. Peel onion and cut into small cubes. Wash, peel and grate carrot.
  2. In a deep frying pan or saucepan, heat butter and add vegetables, cook on a medium heat until soft (don’t brown). Add liver and fry for 8-10 minutes. Add one tablespoon of cognac, herbs and season to taste. Simmer on a medium-low heat for 5 minutes. Add water, cream, bring to boil and turn off the heat. Leave to cool at room temperature.
  3. Transfer to a food processor or puree with hand blender. If the consistency is too thick, add more warm water or stock. Adjust the seasoning. Add soft butter, cognac and blend again.
  4. You can make a butter ‘lead’, for that heat the butter in a small bowl and pour over the cooled pate.
  5. Transfer pate to a bowl and keep covered in the fridge up to 5 days.

Enjoy! 


Coriander Chicken Drumsticks

 Today I realized that I haven’t ate chicken for quite a long time. When I was a teenager chicken drumsticks weren’t available as a separate part of a chicken. When my mother wanted to prepare chicken for dinner she used to buy whole chicken thighs and cook it as is or cut into two parts.. I’m not even sure that drumsticks are on sale in Russian stores now, may be except the capital. Anyway, nicely spiced and roasted chicken drumsticks is a good and quick-to-cook midweek meal (with some rice or potatoes on a side) or a very good accompaniment to a beer! For this recipe I grind dried coriander seeds, then add turmeric and mild paprika, stir into the meat along with olive oil and let it marinade. If you’re hungry, skip the marinating and roast it straightaway! 🙂Coriander Chicken Drumsticks

Coriander Chicken Drumsticks

  • Servings: 2-3
  • Difficulty: easy
  • Print

Ingredients
500g chicken drumsticks (I used without skin)
2-3 tsp dried coriander seeds
1 tsp turmeric
3/4 tsp mild paprika (or hot if you like)
2 tbsp olive oil
1 tsp lime juice (or lemon)
2-3 garlic clove, unpeeled
freshly ground black and white pepper, to taste
sea salt, to taste
  • Grind or crush coriander seeds, mix with turmeric and paprika. Combine with olive oil and lime juice. Rub the marinade into chicken drumsticks. Add garlic cloves, season generously with pepper and salt to taste. Cover and leave to marinade in the fridge for 1-3 hours, or skip this step and arrange chicken (with all marinade juices) onto a baking tray or dish.
  • Bake in the preheated 200C oven for 20 minutes. Then low the heat to 150C, cover with a piece of foil and bake for 10 minutes longer or until the drumsticks have cooked through.
  • Serve warm, but they are also good cold. The cooked drumsticks will keep in the fridge for 2 days.