Festive Cooking

Citrusy Scampi with fennel salad

30

One day my husband brought home these strange-looking shrimps from a local fish market. A fishmonger called it ‘scampi’, wikipedia told it’s a kind of shrimps or langoustines. So, I’d decided to make a citrusy marinade as for shrimps and then fried it. Sliced fennel with cubes of bell pepper and orange segments worked out great with fried scampi. The smell was amazing! It turned out unbelievably delicious! This scampi recipe can be done in minimal time, super tasty and will leave you satisfied! Scampi with fennel-orange salad
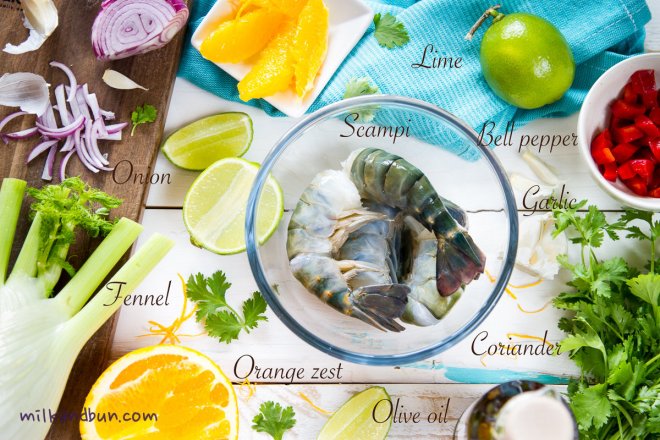
Now, it’s one of my favorite seafood meals. Moreover, it looks elegant and you can serve it as a top-class dish for your guests or for a romantic dinner under the stars in your garden. 🙂Ingredients for Scampi Recipe

Citrusy scampi with fennel salad

  • Servings: 2
  • Difficulty: moderate
  • Print
You can substitute scampi with large prawns.
Ingredients
3 large scampi per person as a starter or 6-7 as a main course
Marinade
2 tbsp olive oil
1 tbsp lime juice
1/2-1 tbsp orange juice
2-3 tsp orange zest
2-3 garlic cloves, crushed or chopped, as you like
1 tbsp fresh chopped coriander
S&P to taste
Salad
1/2 red onion
1 small fennel bulb or 1/2 large
1/2-1 bell pepper, red
2 tbsp extra virgin olive oil
2 tsp white balsamic vinegar
1 orange
S&P to taste
Serving
fresh chopped coriander
extra virgin olive oil or basil oil
Preparation method
  1. Cut the fennel and onion into  julienne (thin slices) and add to the mixing bowl with the balsamic vinegar and oil, toss in. Cut bell pepper into small cubes, add to the bowl. Remove the rind on the orange then cut into segments and add to the mixing bowl (save all orange juices and add it to the salad); gently toss in the bowl with all ingredients. Reserve at room temperature.
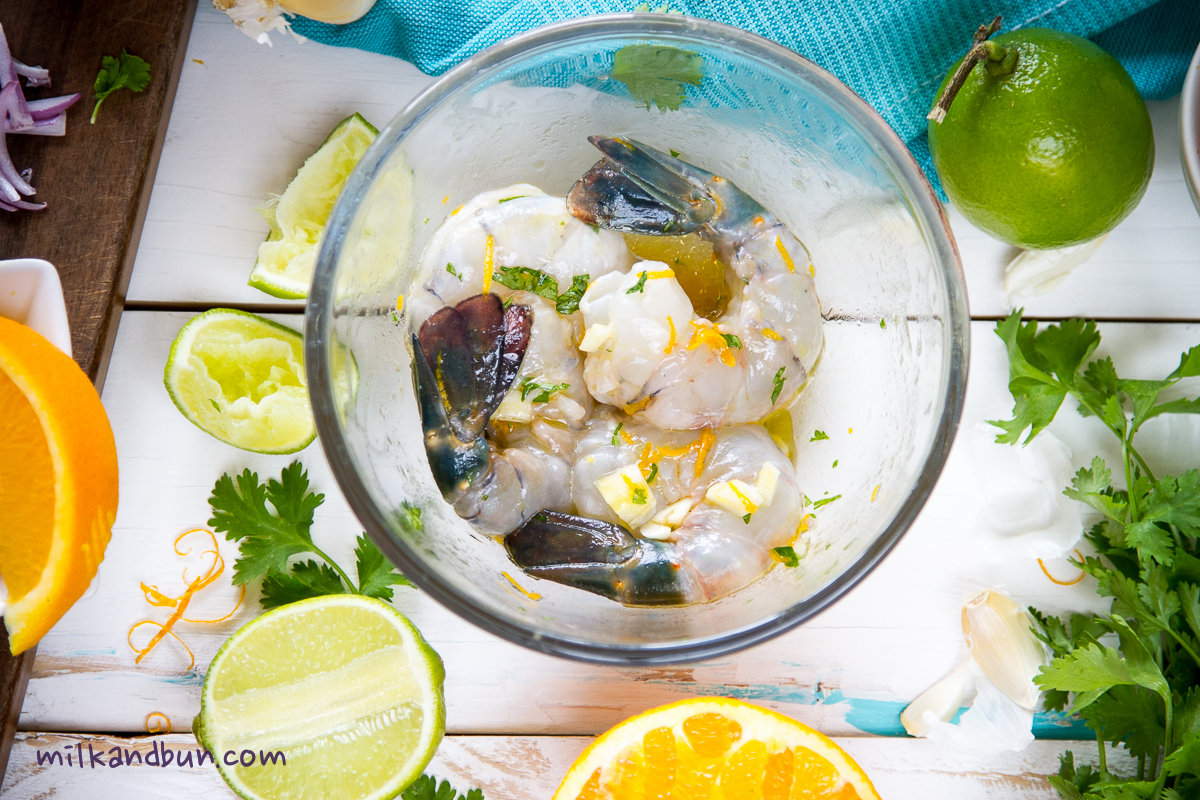
  2. Clean scampi, leave tails on if desired. In a bowl mix together olive oil, citrus juices, garlic, chopped coriander and orange zest. Add scampi and leave to marinate for 30 minutes to 1-2 hours. Heat the frying pan on a medium-high heat, add scampi without marinade. Cook for 2-4 minutes on each side, depends on the size of scampi. Season to taste.
  3. Season the salad and gently mix. Divide the salad evenly on plates. Serve salad with scampi placed on top. Sprinkle with finely chopped coriander and drizzle even more oil, if desired.
Enjoy!

Scampi in citrusy marinade

Sharing at 62nd FF party with Angie, co-hosts JessPrudy and all guests! Hope you all gonna love these bright, healthy and delicious dish!

Braised Rabbit with red wine, prunes and thyme

 I’m sure you know that Easter is on the way (Catholic falls on April 5 and Orthodox April 12), and you’re probably planning what to cook, or searching your notes with traditional recipes. I think some of you have a special main course recipe for this occasion, or may be it’s a wide range of recipes. What will you choose this year? An elegant dish or simple&casual? I think, with spring bringing nice and pretty weather, that you’re likely to be in the mood for something hearty and light! 🙂Braised Rabbit I’ve always been partial to rabbit; when I’m visiting my parents in Russia I’m always pleased to eat a rabbit stewed in sour cream. It’s always tender and delicious, of course because it’s prepared by my mom. 😀 Today recipe is elegant and great for a special dinner! I’d like you to try rabbit with prunes and thyme, braised in red wine. It requires few ingredients to be transformed into a flavoursome meal! Enjoy!Braised Rabbit with prunes, juniper berries and thyme

Braised Rabbit with red wine, prunes and thyme

  • Servings: 3-4
  • Difficulty: moderate
  • Print
Ingredients
1 rabbit, 1.3-1.5kg
water
1-2 tsp apple or wine vinegar, optional
2 tbsp olive oil
20g butter
1-2 garlic clove, peeled, chopped
5-6 shallots or 1 onion, chopped
1 bay leaf
4 black peppercorns, optional
4-5 juniper berries
12-15 prunes, pitted
4 springs thyme or 1 tsp dried
150ml dry red wine
100ml or more hot water, if needed
sea salt and white pepper to taste
Garnish
boiled or roasted potatoes
sour cream
Preparation method
  1. Joint the rabbit, wash it and put in a large bowl, fully cover the meat with water, add vinegar if using, then cover with a wrap and leave to marinate for 1-3 hours. It helps to make rabbit meat more tender and get rid of any unpleasant smell.
  2. Heat the oil and butter in a heavy-bottom pan on a medium-high heat.  Add the rabbit pieces and brown each side for 6-8 minutes or until golden colour. Take out the rabbit pieces and place aside. Don’t clean the pan.
  3. Reduce the heat to medium, add onions, garlic, peppercorns (if using), juniper berries, bay leaf, some thyme leaves and sauté for 3-5 minutes or until onion have softened. Add rabbit, pour over wine and scrape up the bottom of the pan. Bring to boil, reduce the heat to medium and simmer for 15 minutes.
  4. Fold in prunes and remaining thyme. Season to taste. The liquid should come half way up the rabbit pieces. So, add some water, if needed. Reduce heat to low, cover with a lid (keep a small slit) and braise the rabbit for 45 minutes. Now turn the rabbit pieces on the other side, adjust the seasoning, again cover the pan with a lid and braise for further 40-45 minutes. The rabbit should be easily pulling off the bone.
  5. Serve with sliced boiled/roasted potatoes, or rice. Add a tablespoon of sour creme, if desired.

Mimosa Salad

 Hello guys! It’s a very special Friday for me. I’m so glad and excited that I’m co-hosting the wonderful virtual party – Fiesta Friday by Angie, and Jhuls is another great co-host this time. I’d like to invite everyone and each of you to join the very-friendly party! Let us know that you’re joined by linking your post to Angie, me and Jhuls. Of course, will be lots of appetizers and welcome drinks, and you can eat&drink non-stop! 😀 Newbies could find the guidelines here. Another point is to bring your favourite dishes and put the link here, so every blogger can grab a slice of your cake or tuck in the stew while chatting. You’re also welcome to visit and like other bloggers’ posts and of course you can leave a comment or just say hi; it’s such a lovely possibility to find new blogofriends, have a small talk and plenty of fun!Mimosa Salad
 I have decided to bring this nice-looking salad to the party, it’s Russian layered salad or to be exact Soviet salad, but still popular in many ex-USSR countries. In Russia we have lots of layered salad recipes, so many that I even don’t how many. 😀 This one is associated with spring (thou, also popular for New Year), Women’s Day and it’s named after the beautiful flower – mimosa. Last layer of the salad is crumbled egg yolks, which remind little yellow blossoms of mimosa. The main ingredient is canned fish here, so the salad is very budget and at the same time tasty, plus looks festive (that was important during deficit time). Usually saury/saira fish is used in ‘mimosa’, but salmon species is also good here, like red or pink salmon. I’ve tried to make it with tuna and can’t recommend it, its meat too dry for this salad, but if it’s the only canned fish you can get – add more sour cream or mayonnaise. Many variations exist – with or without potatoes, with cheese, spring onions, grated butter, etc. Better to prepare this salad some time in advance before serving to allow all layers to soak; so you can make it a night ahead.
Russian Salad-Mimosa

Mimosa Salad

  • Servings: 4-6
  • Difficulty: easy
  • Print
To make salad more rich you can add some grated butter – between carrot and yolks layer. 
Ingredients
1 large or 2 medium potatoes
1 large carrot
3 large eggs or 4 medium
250g canned fish (I used red salmon)
1 small onion, finely chopped
150-200g mix of sour cream and mayo (or only mayo)
some fresh dill, optional
salt to taste
Method
  • Wash potatoes and carrot, don’t peel. In a large pot with water, add potatoes, carrot and boil it until ready. Cool, peel the skin, then grate on a small or medium grater into separate bowls. Set aside.
  • Hard boil the eggs, cool and separate whites and yolks. Finely chop or grate.
  • Put chopped onion into a small bowl, cover with hot water and keep for 10 minutes. Drain the water.
  • Drain the fish and mash it with a fork.
  • Prepare a deep serving bowl or another serving plate. Arrange grated potatoes evenly on the bottom. Spread some mayo.
  • Make fish layer, then add chopped onion and spread more mayo.
  • Arrange egg whites and spread again mayo.
  • Arrange grated carrot and spread again mayo.
  • Arrange egg yolks. It was the last layer.
  • You can sprinkle the salad with chopped dill, if desired, or decorate whatever you want. Enjoy!
You can cover the salad with a piece of foil and keep in the fridge for 2-3 days.

Mimosa-Russian layered salad

Maslenitsa (Butter Week). Blini recipe.

 Maslenitsa (Butter Week) is a Christian holiday, one of the brightest and widely-celebrated holiday in Russia, a week before Great Lent. The name Maslenitsa came from Russian word ‘maslo’ which means butter. In the beginning of 16th century, when Church initiated the holiday, it was restricted to eat meat, however fish was allowed, as well as dairy products and butter. Most of the peasants could afford to eat only butter, thus the week began to call Butter Week or Maslenitsa.
 During Druids’ times- before 16th century in Rus’ (old Russia’s name) was celebrated a pagan holiday – The Day of spring equinox, which was called Komoedica. It was one of the ancient pagan holidays, celebration of greeting spring, and moreover, worship of the Slavic Bear God: early in the morning people got together, song the songs and went into the forest to praise the Bear God, so they left first and freshly-cooked blini on tree stumps to treat him. After that the Butter Week revelry had been started.Russian stuffed blini (crepes)
 That time Spring was considered as a beginning of new life, people revered to the Sun and made round flat-bread as its symbol. But  in 9th century peasants began to make round-shaped blini. Hot and yellowish, blini became new symbol of the Sun; people also believed that with eating blini they had a piece of warmth and power of the Sun.
 In ancient times the Komoeditsa holiday was celebrated during two weeks and played an important role for peasants. After a long, cold and often starving winter people had to eat plenty of food (usually it was winter stock remains), cheered up and got stronger for future spring works. Butter week celebrations denoted that winter has passed, and it’s time for a warm season to come. After this holiday peasants began to work from sunrise until sunset during all warm months – spring, summer and autumn. Up to next snow season, they forced to work almost non-stop, without any weekends to get food for their families, fodder for cattle; they repair houses, and cut woods to keep homes warm during the long Russian winter.Russian Blini
 When Christianity was established as a state religion, all pagan celebrations and traditions were prohibited; Christian churchmen battle in a vain attempt to stop all holiday habits. After several centuries of unsuccessful fights, in 16th century the Church created new holiday – ‘meatless week’, the week before the Great Lent. People got used to the new holiday, started celebrate it widely and created other name – Maslenitsa.
 Finally traditional Maslenitsa celebrations were set in 18th century by Russian Emperor Petr I, who was a famous reveller and  party lover. Of course, the main treat was blini, which were baked and eaten in enormous amounts!
 One of my fav sweet fillings for blini is a mixture of tvorog (cottage cheese), sour cream, raisins and sugar. For me, it’s a pure indulgence to tuck the delicious filling into piping hot blini! You can also fold blini into half then half again to form wedge, then take the wedge and deep it onto sweet condensed milk.. Incredibly satisfying breakfast or lunch, or even dinner! 😀
 This blini recipe suits for any savory filling as well.

Russian blini. Sweet cottage cheese filling.

Ingredients 
2 eggs, medium size
a good pinch of salt
1-2 tbsp white sugar, optional
200ml hot water
1/2 tsp soda
200-230ml kefir (or sour milk/laban/buttermilk), 2-3% fat
150-170g plain flour
3-4 tbsp sunflower oil
some oil for frying, if needed
Filling
300-400g soft cottage cheese
2-3 tbsp sour cream, or more if needed
2-3 tbsp sugar or sweet condensed milk
50-60g sultana/raisins
Garnish
sour cream/sweet condensed milk/icing sugar
  • In a large mixing bowl, beat eggs with salt and sugar.
  • In a glass or cup mix water with soda, stir and add to the eggs, stirring constantly.
  • Add kefir and mix well.
  • Sift flour and add it to the batter. Stir to combine.
  • Add oil and stir.
  • Let the batter rest for 20-30 minutes, if you have time.
  • Heat the frying pan and fry thin pancakes as usual. You can make any diameter you like.
  • For the filling, soak sultanas in hot water for 5-10 minutes, then drain. Mix all ingredients until well combined.
  • To assemble, spoon some filling in center of each pancake. Fold bottom edge of pancake over fililng, fold in both sides and roll up. Sprinkle with icing sugar and/or drizzle some sweet condensed milk, if desired. Or serve with a dollop of sour cream.

Enjoy!

Russian red blini (pancakes)

  For many people St.Valentine Day is red roses, dinner in a restaurant, chocolate desserts and other heart-shape stuff. Does it seems boring only for me? I think, the best way to diversify this ‘red’ day is by trying something new, like eat non-chocolate dessert, or if you always go out this day stay in to cook a decadent dinner for two. Unleash your creativity! It can be flavorsome salmon steaks or roast quails, you can experiment with sauces.. A small change can have a huge effect! 😉Red blini (with heart)

 A perfect St.Valentine Day can be started by serving a late breakfast that will get both of you in the loving mood. Ready to leave an impression? Prepare these amazing Russian red blini (pancakes)!  Beets give pancakes stunning color and delicate sweetness. They are the perfect way to treat those you love! Russian blini

 Next week, starts from Monday, will be one of the brightest and entertaining of Russian holidays – Maslenitsa, or also knows as Butterweek or Pancake Week. It’s celebrated during the last week before Great Lent. It’s the festival with lots of fun, dance, songs and of course huge amount of blini, which is constantly cooked throughout the week. I’ll be posting more about Maslenitsa next week.

Russian red blini

IngredientsRussian blini
130-150g beet, cooked
200-230ml milk, full fat
200ml sparkling mineral water
2 eggs, medium size
a good pinch of salt
2 tsp white sugar, optional
2 tbsp sunflower oil
150-170g plain flour
some oil for frying, if needed
sour cream for garnish, if desired
  • Puree cooked beet with hand blender or in a food processor until smooth. Add milk, water and stir.
  • In a medium bowl, beat eggs with salt and sugar. Add it to the batter along with oil; stir.
  • Sift flour and add it to the batter. Stir to combine.
  • Let the batter rest for 10 minutes.
  • Meanwhile, heat the frying pan and fry thin pancakes as usual. You can make any diameter you like.
  • Serve warm with sour cream or other garnish.
Sweet garnish: sour cream with honey and chopped pear; sweet cottage cheese; mix berries with sweeten condensed milk.
Savory garnish: cured salmon slices; cheese with herbs; ham.
Enjoy!
I’m bringing these lovely and tasty Russian blini to the Angie‘s Fiesta Friday party, co-hosts Suzanne and Sue and to all beautiful ladies! Hope you all have a wonderful St.Valentine day!