Tag Archives: food photo

Mimosa Salad

 Hello guys! It’s a very special Friday for me. I’m so glad and excited that I’m co-hosting the wonderful virtual party – Fiesta Friday by Angie, and Jhuls is another great co-host this time. I’d like to invite everyone and each of you to join the very-friendly party! Let us know that you’re joined by linking your post to Angie, me and Jhuls. Of course, will be lots of appetizers and welcome drinks, and you can eat&drink non-stop! 😀 Newbies could find the guidelines here. Another point is to bring your favourite dishes and put the link here, so every blogger can grab a slice of your cake or tuck in the stew while chatting. You’re also welcome to visit and like other bloggers’ posts and of course you can leave a comment or just say hi; it’s such a lovely possibility to find new blogofriends, have a small talk and plenty of fun!Mimosa Salad
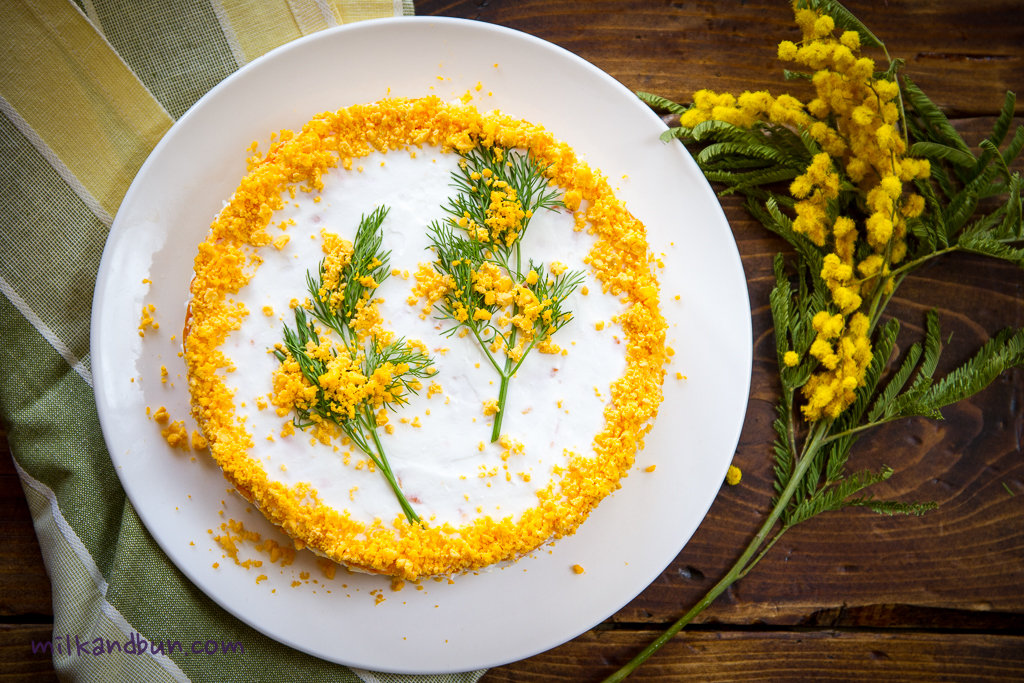
 I have decided to bring this nice-looking salad to the party, it’s Russian layered salad or to be exact Soviet salad, but still popular in many ex-USSR countries. In Russia we have lots of layered salad recipes, so many that I even don’t how many. 😀 This one is associated with spring (thou, also popular for New Year), Women’s Day and it’s named after the beautiful flower – mimosa. Last layer of the salad is crumbled egg yolks, which remind little yellow blossoms of mimosa. The main ingredient is canned fish here, so the salad is very budget and at the same time tasty, plus looks festive (that was important during deficit time). Usually saury/saira fish is used in ‘mimosa’, but salmon species is also good here, like red or pink salmon. I’ve tried to make it with tuna and can’t recommend it, its meat too dry for this salad, but if it’s the only canned fish you can get – add more sour cream or mayonnaise. Many variations exist – with or without potatoes, with cheese, spring onions, grated butter, etc. Better to prepare this salad some time in advance before serving to allow all layers to soak; so you can make it a night ahead.
Russian Salad-Mimosa

Mimosa Salad

  • Servings: 4-6
  • Difficulty: easy
  • Print
To make salad more rich you can add some grated butter – between carrot and yolks layer. 
Ingredients
1 large or 2 medium potatoes
1 large carrot
3 large eggs or 4 medium
250g canned fish (I used red salmon)
1 small onion, finely chopped
150-200g mix of sour cream and mayo (or only mayo)
some fresh dill, optional
salt to taste
Method
  • Wash potatoes and carrot, don’t peel. In a large pot with water, add potatoes, carrot and boil it until ready. Cool, peel the skin, then grate on a small or medium grater into separate bowls. Set aside.
  • Hard boil the eggs, cool and separate whites and yolks. Finely chop or grate.
  • Put chopped onion into a small bowl, cover with hot water and keep for 10 minutes. Drain the water.
  • Drain the fish and mash it with a fork.
  • Prepare a deep serving bowl or another serving plate. Arrange grated potatoes evenly on the bottom. Spread some mayo.
  • Make fish layer, then add chopped onion and spread more mayo.
  • Arrange egg whites and spread again mayo.
  • Arrange grated carrot and spread again mayo.
  • Arrange egg yolks. It was the last layer.
  • You can sprinkle the salad with chopped dill, if desired, or decorate whatever you want. Enjoy!
You can cover the salad with a piece of foil and keep in the fridge for 2-3 days.

Mimosa-Russian layered salad

Pear&Blackberry Tart

 Last weekend I wanted to make a cake, I was dreaming about a huge layered cake with delicious and sweet cream, topped with chocolate or strawberries, or blackberries.. At the end of the day I realized that I can’t decide which one to make and I don’t have all required ingredients. 😀 But I have always been a person that needs something sweet after dinner. I wanted a dessert to satisfy my sweet tooth, and better with cream! So I’ve come up with this beautiful and absolutely delicious ‘pear and blackberry tart’. Honestly speaking, I haven’t made this recipe a dozen or even a couple of times, it was perfect from the first attempt! Nutty shortbread base, tender whipped ricotta cream, pear slices and blackberries – all those things merged together into divine combination. I believe that you would find this dessert to be as delicious as it looks! You just need to go to the kitchen, cook it and enjoy! 🙂 I will make it again for sure!

Pear&Blackberry Tart

Pear and Blackberry Tart

  • Servings: 4-6
  • Difficulty: moderate
  • Print
You can use any favourite fruits and berries, like strawberry&blueberry, raspberry&nectarines.
Ingredients
Short pastry (base)
1 large egg, at room temperature
100g plain flour
75g butter, cubed and softened
35g fine sugar
30g ground almonds
Topping
100ml whipping cream (30-35%), cold
1+1 Tbsp icing sugar
1 tsp cognac or brandy, optional
100-120g ricotta
1 tsp vanilla extract
1 tsp lemon zest
1 large pear, sliced
1 Tbsp lemon juice
8-10 blackberries
2-3 strawberries, sliced, optional
1 Tbsp white chocolate chips
  1. Whisk the egg and set aside a half (a bit less then half) for a glaze.
  2. To make the dough, in a large mixing bowl or food processor, mix flour, butter, sugar, half the egg and almonds until combined. Tip dough out onto a floured surface and bring together with hands.  Make a flat disk, cover with plastic wrap and chill for 30-40 minutes in a fridge.
  3. On a lightly floured table roll the dough into 21-22cm circle. Brush with remaining egg. Transfer to a paper-lined baking dish.
  4. Bake in preheated 180C oven for 25 minutes or until golden. Allow to cool completely.
  5. Meanwhile, in a bowl beat cream with 1 Tbsp icing sugar and cognac, if using, until soft peak begin to form. In another bowl, combine ricotta, vanilla, lemon zest and sugar. Add ricotta mixture into whipped cream and whip until smooth for a 1-2 minutes.
  6. Spread cream on the base. Sprinkle pear slices with lemon juice. Arrange pear slices, blackberries and strawberries, if using, on the cream, and sprinkle over chocolate chips. Dust with extra icing sugar, if desired. Enjoy!

PBB tar-2

Russian buckwheat kasha with mushrooms

 Buckwheat has always been a popular grain in Russia. It was brought in 7th century from Greece and soon became  extremely popular. Buckwheat was new and unknown grain in Russia, so it was called “Greek grain” or shortly “grechka”. It’s not a surprise why buckwheat was very beloved in old Russia: peasants called it “mother”, they grown it in a large amounts, so it was cheap and affordable grain. Moreover, it’s cooked quickly and has a high nutritional value – a plate of buckwheat kasha (porridge) for breakfast can keep you full for a long time. Buckwheat porridge was a favorite meal not only among peasants, it was also cooked for upper classes but with plenty of butter or sour cream. 
 Nowadays, there are lots of recipes with buckwheat, it’s cooked with milk and eaten for breakfast or as a side dish for meat like beefstroganov. Buckwheat porridge with fried onion and mushrooms is a popular dish in Russia, especially during the Great Lent when grains, vegetables and mushrooms become the main foods.
Russian Buckwheat Kasha
  Hope all lovely bloggers partying at Fiesta Friday will like this Russian buckwheat porridge, it contains vitamins, healthy organic acids and oils! Enjoy! 🙂

Russian buckwheat kasha with mushrooms

  • Servings: 2
  • Difficulty: easy
  • Print
During the Great Lent or for vegetarian option omit the butter or substitute it with any veg.oil 
IngredientsBuckwheat Kasha (porridge)
200ml buckwheat
400ml water
1 tsp butter
1 Tbsp sunflower or other veg.oil
1 large onion, chopped
200g mixed mushrooms (or 400g frozen), chopped
25-30g butter
salt, pepper to taste
fresh chopped parsley, optional
  1. Wash buckwheat, put it a thick-bottomed or iron-castle pan, fry on a low heat without any oil for 2-3 minutes. Add water and good pinch of salt. Bring it to boil on a medium heat, then reduce the heat to low, add a teaspoon butter and simmer for 17-20 minutes or until all water will be absorbed. Don’t stir buckwheat during the cooking. When it’s ready, take the pan off the heat, cover with lid and few kitchen towels, let it rest for 5-10 minutes.
  2. Meanwhile, heat the oil in a frying pan, add onion and fry for few minutes. Stir in mushrooms, season to taste and fry on a medium-high heat until mushrooms are ready.
  3. Stir the mushroom mixture and butter into buckwheat. Sprinkle with parsley, if desired. Serve warm as a main dish or side dish to chicken, stewed meat or sausages. Enjoy!

Buckwheat Kasha with mushrooms

Midweek Salad

 Hey guys! What do you cook during the week? If it’s going to be a hectic working week – do you make anything time-consuming? Personally, if I’m tired I don’t cook complicated dishes and eat simple dishes, including lots of different salads. Hopefully, you eat well and do not buy unhealthy quick and junk meals as I do. Moreover, it seems to me that to make a salad or simple pasta at home for your tomorrow lunch is much cheaper and healthier than to eat any junk-food. Thus, eating healthy foods whiteout spending a lot is possible, and I suggest you to start prepare salads like this one. I love beets and add it everywhere, caramelized beets is even more tasty! Eat the salad, man! 😀Midweek salad

Midweek Salad

  • Servings: 2
  • Difficulty: easy
  • Print
Ingredients
1 medium beet, cooked
2-3 tsp brown sugar
1/2 Tbsp balsamic or wine vinegar
1 Tbsp olive oil
100-120g green beans
10-15g butter
8-10 cherry tomatoes, yellow or red, cut into halves
60-80g feta cheese, crumbled
bull’s blood leaves, a handful
2 tsp black sesame seeds
1-2 Tbsp pumpkin seeds, toasted
S&P to taste
extra virgin olive oil
basil micro sprouts, optional
  • Cut the beet into small cubes or wedges. In a frying pan or saucepan, combine vinegar, oil and sugar on medium heat; mix to combine. Add beet cubes and swirl to coat. Cook on a medium heat for 7-10 minutes.
  • In a small saucepan, put beans and cover with water, add a butter, some salt and bring to boil. Reduce the heat and simmer for 4-5 minutes. Drain the water.
  • On a serving plate, arrange washed leaves, put on beat cubes, beans, tomatoes and feta. Sprinckle with sesame and pumpkin seeds. Drizzle with olive oil, if desired, garnish with basil and season to taste. Enjoy!

Arabian kofta

 Kofta or Kufta is a simple dish, small balls of minced meat – usually lamb or mutton blended with fresh herbs, aromatic spices, garlic and/or onions. These meatballs are very popular in Middle Eastern countries like UAE, Lebanon, Syria, Morocco, and there is no fixed recipe, each cook adds their favourite spices like chilli, cinnamon or cardamom. I highly recommend you to not omit fresh herbs; mint, coriander and parsley give kofta amazing freshness. Lamb meat is often used for kofta, but if you don’t eat lamb meat or it’s too fatty for you – you can easily substitute it with beef; in that case I suggest you to add a tablespoon of olive oil or butter for richness. And of course, the meat should be finely minced.
Arabian Kofta
 Kofta meatballs can be grilled, fried or even baked. Serve them with rice, fresh tomatoes and olives. I love to eat them wrapped in Arabic bread with a slice of roast eggplant, tomato and chopped fresh herbs, and dipping this lip-smacking wrap into hummus. 🙂
Arabain Kofta - lamb meatballs

Arabian kofta

  • Servings: 28 small meatballs
  • Difficulty: easy
  • Print

Ingredients Arabian Kufta

500g finely ground lamb
100ml sparkling mineral water
2-3 garlic cloves, minced
1 Tbsp fresh mint leaves, finely chopped
3-4 Tbsp fresh coriander leaves, chopped
1 tsp cumin
1/2 tsp cinnamon
1/2-1 tsp harissa paste, optional
S&P to taste
2 Tbsp olive oil for frying
Garnish
Arabic bread, hummus, chopped iceberg and herbs
  1. In a large bowl, mix meat with water. Add garlic, herbs, spices, season to taste and mix throughly with you hand.
  2. Form small meatballs, the size of walnut.
  3. Heat the frying pan with oil, add kofta meatballs and fry all over for 6-7 minutes or until cooked through.
  4. Serve with bread, lettuce, herbs and hummus, if desired.
Enjoy!
Kofta- Arabian lamb meatballs
1 19 20 21 35