Russian cuisine

Russian Easter. Kulich

 Today is Paskha (Easter) in Russia, it’s a bright and warm festival that is celebrated among Orthodox Christians. Traditional and famous treats for this day are the colored eggs, kulichi, and paskha (in my next post). During this day we congratulate each other and say ‘Христос Воскресе’ which means Christ is risen, and the reply is ‘Воистину Воскресе’ – indeed hi is risen.Easter cake-Kulich
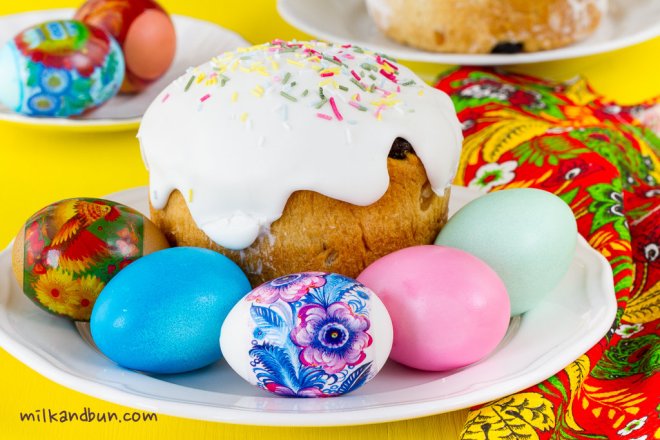
 Kulich is a special Easter sweet cake/bread which usually has a cylindrical shape and decorated with white icing. It’s made from rich yeast dough; raisins, currants or candied fruits can be added. Traditionally kulichi have a cylindrical shape, and some Russian housewives use empty tins from pea or beans for that purpose. After baking and cooling kulichi is glazed with white icing (egg white or water with sugar) and decorated with edible sugar beads, flowers, and thin candles. Kulichi and died eggs can be also blessed in church; a part of Easter treats usually is leaved in church for poor people.Kulich- Russian Easter cake

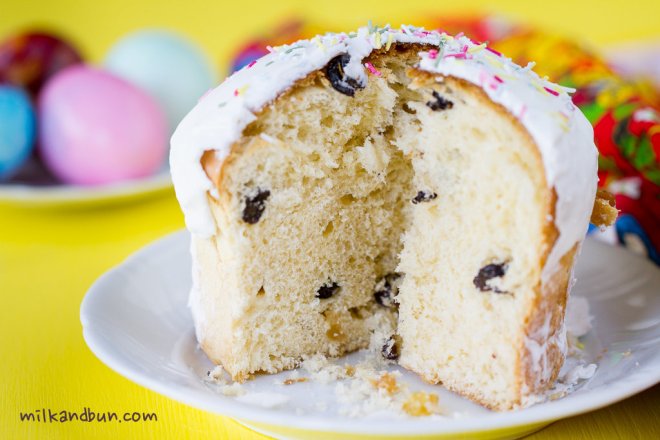
Kulich recipe {Russian Easter cake}

  • Servings: 2 pieces
  • Difficulty: moderate
  • Print
I used large eggs. Egg for the glazing needs to be very fresh.
The dough should be soft, but if needed add more flour.
 

Ingredients

350g plain flour

5-6g yeast
small pinch of salt
130ml milk, warm
1 egg
1 egg yolk
80g white sugar (or 90-100g to make it sweeter)
1 tsp vanilla extract or vanilla sugar
50g butter, very soft but not melted
60g raisins (golden)
60g currants (dark)
Icing
1 egg white
150-160g icing sugar
1 tsp lemon juice
Sprinkles for decorating
Preparation method
  1. In a large mixing bowl, sift 100g of flour, add salt, yeast, warm milk and stir to combine. Cover with a wet kitchen towel and let it rise for 30 minutes.
  2. Meanwhile, in a small bowl, whisk a whole egg, egg yolk, vanilla and sugar with a hand or electric mixer for 2-3 minutes until pale. Add egg mixture and butter to the dough, mix to combine. Sift the remaining flour and knead to combine. Cover again with a wet kitchen towel and let it rise for 30-40 minutes.
  3. Wash raisins and currants, blot it up with a paper towel, sprinkle with a teaspoon of flour – you need to cover all raisins with some flour, it allows them to be evenly distributed throughout the dough. Add raisins and currants to the dough, mix into the dough. Cover with a wet kitchen towel and let it rise for 60 minutes.
  4. Line baking pans with baking paper, grease with butter. Divide the dough between two baking pans, the dough should occupy 1/3-1/2 of the volume (because it will rise very high during baking) of the volume. Cover and let it rise for 20-30 minutes.
  5. Bake in preheated 100C oven for 10 minutes, then in 180C for 30 minutes or until the toothpick inserted into it gets back dry. If the top becomes too golden – cover kulichi with a piece of foil or baking pepper.
  6. Take out of the oven, let it completely cool.
  7. For the icing, whisk the egg white with few tablespoons of sugar and lemon juice until well combined. Or beat it with an electric mixer on a low speed. Gradually add more sugar and whisk again. Keep adding sugar until you get the desired consistency (not too liquid).
  8. Spread the icing on top of each kulich with a tablespoon. Add sprinkles. Let it dry.

Enjoy!

Cover kulichi in the foil and keep in the fridge for up to 3-4 days.

Russian Easter sweet cake -kulich

Pirogki with spring onions and eggs

 Pirogki means small pies in Russian. Most of the time yeast dough is used for these delicious pirogki, like I made for Kulebyaka pie. But making such dough is a time-consuming, and you need to make lots of small pies or one big. I suggest you to try the dough based on kefir or any other soured milk product, it’s very quickly to prepare, and you can use both sweet and savory filling. Today I chose one of favourite filling in my family – a mixture of chopped spring onions and hard-boiled eggs. Pirogki with this filling reminds me warm days in Russia, first of the spring crops, including young and juicy spring onions from parents’ garden and amazing aroma of these pies. For my husband, it brings memories about his grandmother, the days she was cooking these pies and serving with a jug of fresh milk. 🙂Pirogki with spring onion and eggs

Pirogki with spring onions and eggs

  • Servings: 3-4
  • Difficulty: easy
  • Print
*Using sour cream is optional, you can substitute it with the same amount of kefir or creme fresh. 
These pirogki is also good with a soup instead of bread.
Ingredients
220-250ml full fat kefir (buttermilk or laban)
1/2 tsp baking soda
1/2 tsp salt
1 tsp white sugar
2 tbsp sour cream*, optional
1 large egg
2 tbsp sunflower oil
400-450g plain flour
Filling
150g spring onions, chopped
1 tbsp butter
4 large eggs, hard-boiled, chopped
S&P to taste
Egg wash
1 large egg yolk
1 tbsp milk
Preparation method
  1. In a large mixing bowl, add kefir, soda, salt, sugar and mix. Leave for 4-5 minutes. Add sour cream (if using), egg, sunflower oil and mix well. Sift the flour into mixture, stir to combine. Cover with plastic wrap or kitchen towel and leave to rest for 20-30 minutes. If you don’t have time – rest it for 10 minutes or for a time while you’re preparing the filling.
  2. For the filling, in a small frying pan melt the butter, add chopped onions and saute on a medium heat for 5-7 minutes until soft. Don’t let it burn. In a bowl combine soft spring onions with eggs, season to taste.
  3. Roll the dough into 10-12cm circles, add 2-3 tsp of the filling into each circle, seal the edges.
  4. Arrange pirogki on a lined baking tray. Brush each pie with egg wash {for egg wash whisk ingredients together}. Bake in preheated 180C oven for 20-22 minutes or until golden.
  5. Serve warm with a glass of milk.
Enjoy! ❤
PiesEggsOnion
Russian pirogki - small pies
Sharing at Fiesta Friday party, wonderful party where Angie is a lovely hostess, and Margy and Selma are co-hosts this time.

Mimosa Salad

 Hello guys! It’s a very special Friday for me. I’m so glad and excited that I’m co-hosting the wonderful virtual party – Fiesta Friday by Angie, and Jhuls is another great co-host this time. I’d like to invite everyone and each of you to join the very-friendly party! Let us know that you’re joined by linking your post to Angie, me and Jhuls. Of course, will be lots of appetizers and welcome drinks, and you can eat&drink non-stop! 😀 Newbies could find the guidelines here. Another point is to bring your favourite dishes and put the link here, so every blogger can grab a slice of your cake or tuck in the stew while chatting. You’re also welcome to visit and like other bloggers’ posts and of course you can leave a comment or just say hi; it’s such a lovely possibility to find new blogofriends, have a small talk and plenty of fun!Mimosa Salad
 I have decided to bring this nice-looking salad to the party, it’s Russian layered salad or to be exact Soviet salad, but still popular in many ex-USSR countries. In Russia we have lots of layered salad recipes, so many that I even don’t how many. 😀 This one is associated with spring (thou, also popular for New Year), Women’s Day and it’s named after the beautiful flower – mimosa. Last layer of the salad is crumbled egg yolks, which remind little yellow blossoms of mimosa. The main ingredient is canned fish here, so the salad is very budget and at the same time tasty, plus looks festive (that was important during deficit time). Usually saury/saira fish is used in ‘mimosa’, but salmon species is also good here, like red or pink salmon. I’ve tried to make it with tuna and can’t recommend it, its meat too dry for this salad, but if it’s the only canned fish you can get – add more sour cream or mayonnaise. Many variations exist – with or without potatoes, with cheese, spring onions, grated butter, etc. Better to prepare this salad some time in advance before serving to allow all layers to soak; so you can make it a night ahead.
Russian Salad-Mimosa

Mimosa Salad

  • Servings: 4-6
  • Difficulty: easy
  • Print
To make salad more rich you can add some grated butter – between carrot and yolks layer. 
Ingredients
1 large or 2 medium potatoes
1 large carrot
3 large eggs or 4 medium
250g canned fish (I used red salmon)
1 small onion, finely chopped
150-200g mix of sour cream and mayo (or only mayo)
some fresh dill, optional
salt to taste
Method
  • Wash potatoes and carrot, don’t peel. In a large pot with water, add potatoes, carrot and boil it until ready. Cool, peel the skin, then grate on a small or medium grater into separate bowls. Set aside.
  • Hard boil the eggs, cool and separate whites and yolks. Finely chop or grate.
  • Put chopped onion into a small bowl, cover with hot water and keep for 10 minutes. Drain the water.
  • Drain the fish and mash it with a fork.
  • Prepare a deep serving bowl or another serving plate. Arrange grated potatoes evenly on the bottom. Spread some mayo.
  • Make fish layer, then add chopped onion and spread more mayo.
  • Arrange egg whites and spread again mayo.
  • Arrange grated carrot and spread again mayo.
  • Arrange egg yolks. It was the last layer.
  • You can sprinkle the salad with chopped dill, if desired, or decorate whatever you want. Enjoy!
You can cover the salad with a piece of foil and keep in the fridge for 2-3 days.

Mimosa-Russian layered salad

Russian buckwheat kasha with mushrooms

 Buckwheat has always been a popular grain in Russia. It was brought in 7th century from Greece and soon became  extremely popular. Buckwheat was new and unknown grain in Russia, so it was called “Greek grain” or shortly “grechka”. It’s not a surprise why buckwheat was very beloved in old Russia: peasants called it “mother”, they grown it in a large amounts, so it was cheap and affordable grain. Moreover, it’s cooked quickly and has a high nutritional value – a plate of buckwheat kasha (porridge) for breakfast can keep you full for a long time. Buckwheat porridge was a favorite meal not only among peasants, it was also cooked for upper classes but with plenty of butter or sour cream. 
 Nowadays, there are lots of recipes with buckwheat, it’s cooked with milk and eaten for breakfast or as a side dish for meat like beefstroganov. Buckwheat porridge with fried onion and mushrooms is a popular dish in Russia, especially during the Great Lent when grains, vegetables and mushrooms become the main foods.
Russian Buckwheat Kasha
  Hope all lovely bloggers partying at Fiesta Friday will like this Russian buckwheat porridge, it contains vitamins, healthy organic acids and oils! Enjoy! 🙂

Russian buckwheat kasha with mushrooms

  • Servings: 2
  • Difficulty: easy
  • Print
During the Great Lent or for vegetarian option omit the butter or substitute it with any veg.oil 
IngredientsBuckwheat Kasha (porridge)
200ml buckwheat
400ml water
1 tsp butter
1 Tbsp sunflower or other veg.oil
1 large onion, chopped
200g mixed mushrooms (or 400g frozen), chopped
25-30g butter
salt, pepper to taste
fresh chopped parsley, optional
  1. Wash buckwheat, put it a thick-bottomed or iron-castle pan, fry on a low heat without any oil for 2-3 minutes. Add water and good pinch of salt. Bring it to boil on a medium heat, then reduce the heat to low, add a teaspoon butter and simmer for 17-20 minutes or until all water will be absorbed. Don’t stir buckwheat during the cooking. When it’s ready, take the pan off the heat, cover with lid and few kitchen towels, let it rest for 5-10 minutes.
  2. Meanwhile, heat the oil in a frying pan, add onion and fry for few minutes. Stir in mushrooms, season to taste and fry on a medium-high heat until mushrooms are ready.
  3. Stir the mushroom mixture and butter into buckwheat. Sprinkle with parsley, if desired. Serve warm as a main dish or side dish to chicken, stewed meat or sausages. Enjoy!

Buckwheat Kasha with mushrooms

Crepe Cake with custard creme

 Yes-yes! It’s blini again! I was eating lots of crepes last two weeks, seems I need to stop. 😀 But this is the whole cake! Believe me, you need to try it once to be obsessed forever! 😉 Just few days back I was watching one video and Russian confectioner made sweet blini-cake, it was a sign to make it and of course to try new recipe of blini. It turned out to be easy to make, but get ready to prepare a lots of blini! Despite the fact that I used too wide pan and the stack wasn’t high as much as I wanted, blini turned out thin, tender and very tasty.Blini Cake with custard cream

 I decided to make custard cream (the confectioner made another cream), which is not very sweet and buttery. The quantity of the cream was more than enough for my cake, so I spread it on each crepe and put the cake in the fridge to set. Impatiently, I sliced into the cake, bite it and was surprised, the crepes absorbed almost all the cream. There was only the one way out – to eat it with sweet condensed milk on side. 😀 So, next time I will make double quantity of the cream.Crepe Cake

Crepe Cake with custard creme

  • Servings: 6-8
  • Difficulty: easy
  • Print
Before assembling the cake, allow the crepes and cream to cool completely.
The crepe-cake tastes also good on the second day and can be a tasty breakfast, if you manage to save a slice that long!
Thin Blini (crepes)
300g flour- sift in a bowl
1 tsp/5g salt
500ml milk
5 eggs, beaten
120ml water
70g butter, melted
Custard cream 
500ml milk, full fat
4 egg yolks
100g fine sugar
40g cornmeal
1 vanilla bean or 1 tsp extract
In a small bowl whisk together sugar and yolks until the mixture is pale. Add cornmeal while continuing to gently whisk the mixture.
In a pan bring milk with vanilla bean to a boil while constantly stirring and taking care not to burn it.
Gradually pour half of the hot milk into the egg mixture  while continuing to stir. Pour egg mixture into the pan with the other half of milk, continuously stir. Continue cooking and stirring to the point of the mixture becoming thick and custard forming – about 10 minutes.
Cool the custard completely.
Enjoy!
1 6 7 8 15