Festive Cooking

Winter Orange Cake

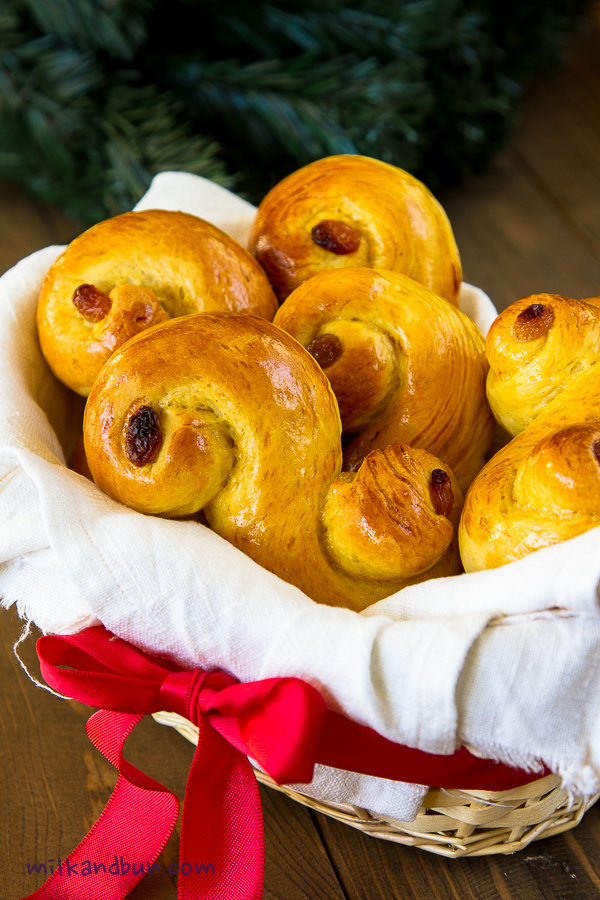
Hello everyone! Hope you had wonderful and joyful winter holidays! As you may know from my previous posts, me and my husband have been to Russia, and it was a memorable and great trip. We celebrated New Year and Christmas eves with the whole family, met with friends, and had lots of fun with a snow: throwing snowballs, rolling and tumbling around, and exploring virgin and deep snow on foot! Once we almost were frozen to the bones, because it was -30C/22F (and the phone told me it was felt like -40C in the night)! But wool socks, mittens, fur hats and thick coats do wonders! 😀
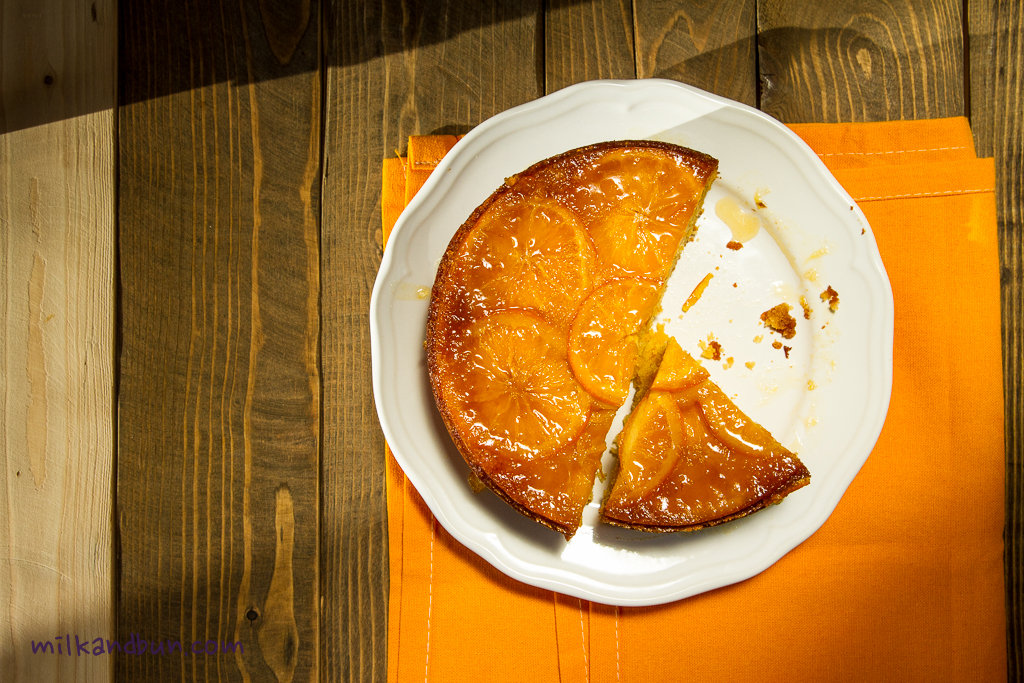
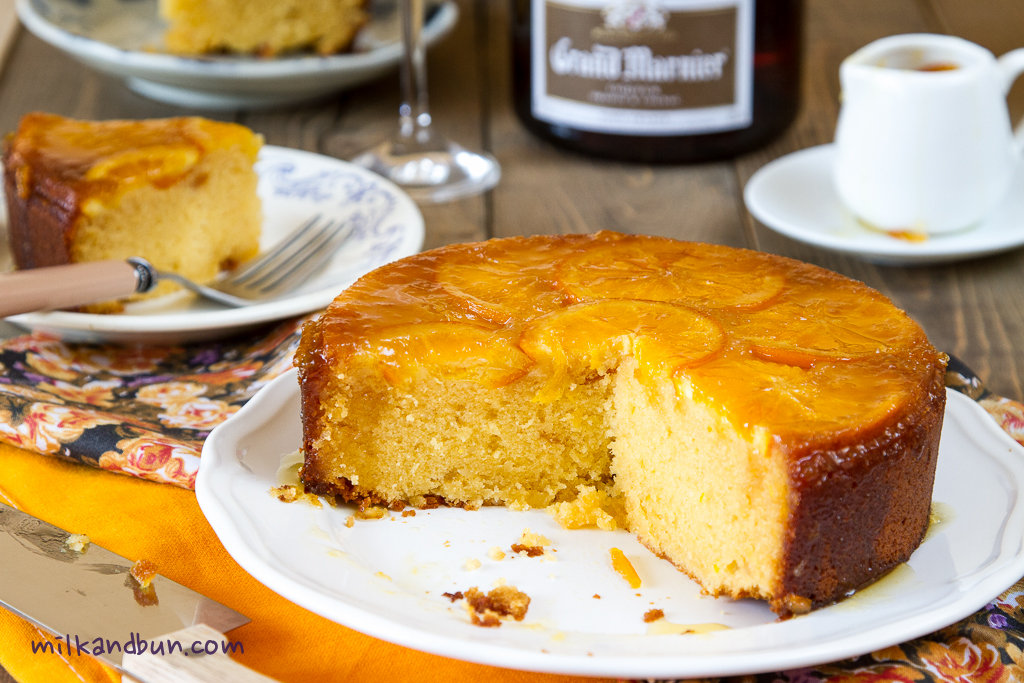
So, I was torn by what recipe to start 2015 with. I decided to warm up cold days with a superb and fantastically delicious winter dessert -an orange cake. Oranges and mandarins may not be the most obvious fruits in baking, but for me it symbolizes the winter season. The smell of mandarins rind always brings back my childhood memories, when my parents bought them for the New Year eve. The cake is moist, bright, tangy, and delightful in both taste and texture. It is also great any time of the year. 🙂
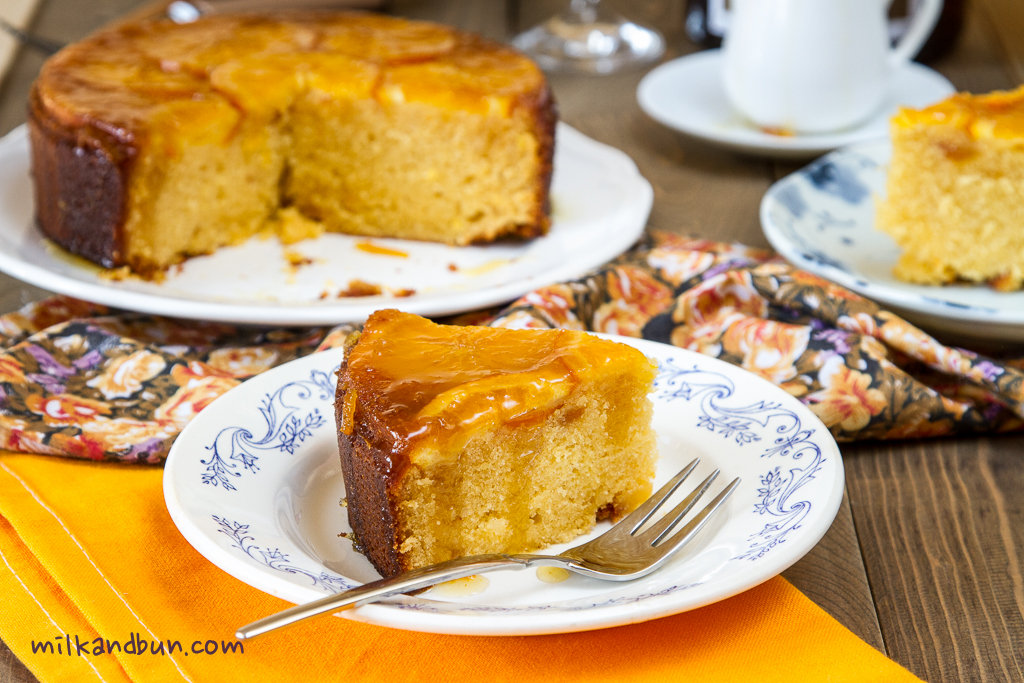
Winter Orange Cake
Orange Cake

Winter Orange Cake

  • Servings: 6-8
  • Difficulty: moderate
  • Print
You can use fresh orange slices as is, or cook them in a sweet water (1 cup water+1/3 cup sugar) for about 20-30 minutes on a medium heat – it helps to get rid of orange bitterness.
IngredientsOrange Cake-2
2 small oranges or 1.5 medium size, sliced
3 Tbsp demerara sugar
160g butter softened
120-150g golden caster sugar, depends on your taste
3 heaped tbsp orange jam (or fine-cut marmalade)
3 eggs, beaten
160g plain flour
1/4 tsp salt
1 1/3 tsp baking powder
40g almond powder (ground almonds)
1.5 medium-size oranges or 2 mandarins, finely grated zest and juice
Glaze:
3 heaped tbsp orange jam/marmalade
1-2 tsp orange-flavoured liqueur (Grand Marnier or Cointreau), optional

Method

  1. Preheat oven to 180C. Grease the 18cm loose-bottomed cake tin. Sprinkle the base with demerara sugar. Arrange orange slices on the base, making overlapping layer.
  2. Beat the butter and caster sugar until pale, mix in marmelade and beaten eggs. Fold in flour, salt, baking powder, almonds, orange or mandarin zest and juice.
  3. Pour the batter into tin. Bake in the oven for 45-55 minutes, until golden and firm to touch.
  4. Allow to cool for a few minutes at room temperature.
  5. Meanwhile, make a glaze by warming 3 Tbsp jam and liqueur (if using) in a small pan with a little water.
  6. Carefully turn out the cake onto a serving plate, while it’s still warm. Prick holes in the cake. Spoon glaze over the cake.
  7. Serve warm! Enjoy!

Adapted from Jamie Oliver magazine/issue 26

Bright Orange Cake

Cottage cheese and cranberry pie

Winter holidays are almost here and I can’t wait to celebrate! Holiday preparation is already well underway and it can be stressful, but I love this hustle and bustle season: frenzied shopping, decorating homes and work places, buying delicacies and champagne, choosing and wrapping gifts for family and friends. I’m absolutely absorbed in the planning of New Year dinner. Shopping list is written, salads and starters are chosen, goose and turkey are waiting in the freezer. And certainly I couldn’t forget about desert. For me it’s an important and sweet part of the dinner. Any festive dinner should be finished with a perfect cake! Have you chose the one? What will be the sweet star on your table? Will it be traditional cake or pudding, that you make every year or a fancy cake, that you’ll order from a restaurant?
Cottage cheese and cranberry pie
 This year I’ll be making the vanilla cheesecake with cranberry or red currant compote. It sounds simple, but that’s exactly what we need this winter – delicious, smooth and tender cake. 🙂 But if you’re tired and bored from all traditional desserts, why don’t you try my festive cake recipe. It seems similar to cheesecake, but I used tvorog (cottage cheese) and sweet condensed milk, and its taste and structure became different. Bright cranberries on the top make this milky and sweet cake absolutely festive! Definitely all guests’ eyes will be on this cake!
CCC Pie
 If you noticed cranberries are small, because it’s Russian, they are smaller and juicier compare to American cranberries. Needless to say, you can use any cranberries you can find, or frozen cherries are also great here.
Festive Pie with cranberries

Cottage cheese and cranberry pie

  • Servings: 6-8
  • Difficulty: moderate
  • Print
A new take on the vanilla cheesecake, this cake will go down well on any occasion.
IngredientsCranberry Pie
Crust
260g flour
160g butter
1 small egg
2-3 Tbsp caster sugar
1 egg yolk for brushing the pastry crust, optional
Filling
450g tvorog/cottage cheese
3Tbsp cream cheese, optional
3-4Tbsp sweetened condensed milk
2 large eggs or 3 small
2 tsp granulated sugar (or omit it and add more condensed milk)
1 tsp vanilla extract
1 Tbsp cognac or brandy, optional
3 Tbsp ground almonds
100-150g cranberries
almond flakes, for decoration
icing sugar, for decoration, optional
Preparation method
  1. Make the cake crust. Cover and rest in the fridge for 30 minutes. Roll out 3mm thick and cut a circle larger than 20cm (approx.26-28cm) baking pan. Bake blind in preheated 180C oven for 20 minutes. Then remove the weights, optionally brush with egg yolk, then return to the oven and bake for 5-6 minutes more.
  2. Meanwhile, in a large mixing bowl beat eggs with condensed milk and sugar if using until the mixture is pale and sugar almost dissolved. Add vanilla, cognac, cream cheese and mix.
  3. If the cottage cheese is very crumble first mash it with a fork, then add to the filling mixture along with ground almonds, and stir to combine. Taste, add more condensed milk if it’s not enough sweet.
  4. Pour the filling into pastry crust. Arrange cranberries on top, and decorate with almond flakes.
  5. Reduce the heat to 170C and bake in the oven for 35-40 minutes or until the filling is set.
  6. Let it cool in the baking pan for 10 minutes, then carefully take out and put on a serving plate. Sprinkle with icing sugar, if desired.
  7. Enjoy!

Cranberry and cottage cheese pie

Saffron buns

 Hello guys! It’s not a secret that I love to bake! And I have to say even more – I’m addicted to pies! 😀 Every time when I stumble upon a new and interesting pie or cake recipe I’m anxious to prepare it! What does attract you in a recipe? An ingredient, a photo or may be a story behind it? For me an every part is captivating and intriguing! As I’ve already said I love to bake whatever it is, whether it’s a vegetarian or sweet thing, like comforting cabbage bake with farmer cheese or beautiful apple pie with semolina. A long time ago I was browsing the Internet and found one lovely recipe of saffron buns, but time has passed anf it got out of my mind until I bought saffron last week. I was glad to discover the story about these buns, because the story is truly magical and wintry.
Every year on the 13th of December people of Scandinavia countries (Norway, Denmark and Sweden) are celebrating the Day of St.Lucia. It’s believed she brings the light into the longest night of the year. Celebration include a procession of young girls in white dresses and red sashes carrying candles. One girl represented as Lucia – she wear a crown of candles on her head. Girls sing traditional and Christmas songs.
By another Sweden custom at home the eldest daughter arising early in the morning, wearing the Lucia’s costume, awaking the family and serving them coffee and saffron buns.*
St.Lucia buns
 After reading about Scandinavian traditions and stories I decided to make those delicious buns! and by coincidence I baked them exactly on the 13th. I made some research and finally created my own recipe. Buns turned out very fluffy, nicely buttery, with amazing aroma of saffron and not very sweet.
Saffron buns

Saffron buns

  • Servings: 8 buns
  • Print
Ingredients St.Lucia saffron buns
120ml full-fat milk
1/2-1/3 tsp saffron threads
45-50g butter, room temperature
250-300g plain flour
4g instant yeast
1/2 tsp salt
30-35g sugar
2-3 cardamom pods, ground, optional
a pinch of freshly grated nutmeg, optional
1 large egg
60ml sour cream
Preparation method
  • Heat milk with saffron (don’t boil) in a small saucepan over medium-low heat. The temperature of milk should  be not over 40C/104F or should be able to easily hold a finger in it. Add butter, stir to combine.
  • In a mixing bowl sift the flour (250g, then add more if needed), add yeast, salt, sugar and spices if using. Mix.
  • Add lukewarm milk mixture to the flour. Stir to combine.
  • Add egg and sour cream. Mix ingredients until well incorporated.
  • Now on a flat surface knead the dough by hand (or use a hook of your standing mixer) for 10 minutes, until smooth and a little sticky to the touch.
  • Cover the dough and leave it to rise for 1 hour at room temperature or until it’s puffy. You can make the dough the day before, in which case after rising gently deflate the dough, cover and leave in the fridge overnight. Take out an hour or two before shaping, let it gets warm and rise again.
  • Gently deflate the dough, and divide into 8 equal sizes; each piece weight about 70g.
  • Roll each piece of dough at a time into a 38-40cm rope, then shape each rope into S-shape.
  • Place buns on the lined baking tray. Tuck in raisins. Cover with a towel and leave to prove for 30 minutes.
  • Brush with egg wash and in preheated 190C/375F for 15-20 minutes or until they’re golden brown.
  • Take buns from oven and let cool for 4-5 minutes before serving.
  • Serve warm with a glass of milk or tea.

Enjoy the winter season!

St.Lucia saffron buns

Herring under a fur coat or Russian Shuba Salad

 It sounds funny and may be a little weird, but that’s how we called a very popular salad in Russia. Exactly under a fur coat, not in. 🙂 I can’t imagine Russian New Year celebration without this salad. Another nickname or short name of the salad is ‘shuba’, that means fur coat in Russian.
The main ingredients are beets, potatoes and lightly salted herring; the salad is composed of vegetable layers coated with mayonnaise. Nowadays, ‘shuba’ has undergone a number of changes, one add hard-boiled eggs, another omit onions or add  an apple. But the one thing is still constant – the salad is incredibly favoured and beloved by many Russians!
Shuba Salad
 A legend says that such salad was created by a merchant Anastas Bogomilov, who was an owner of the popular tavern and restaurant chain in Moscow at the beginning of the 20th century. It was a time of The Civil War and Revolution in Russia, and taverns’ visitors discussed the Russian future with patriotic fervour, so they became furious and began to fight. And of course, they broke some furniture and smashed plates during their drunken brawls. To avoid it, a merchant devised a stratagem – to make a well-nourishing zakuska (a starter) and a symbol of the public union in one dish. Thus, one of his cooks – Aristarkh Prokopcev prepared and served a new salad ‘shuba’ at the New 1918 Year eve, where red color of beetroots symbolized the red flag, and potatoes were the food of workers and peasants. Shuba was an abbreviation, first letters of a slogan; Sh for Chauvinism, U for Decay, B for Boycott, A for Anathema. Visitors and guests liked this salad and began to order it often. As the salad were fatty, guests couldn’t got drunk very fast, thus scuffles happened rarely and furniture was left untouched.
 Long after, people forgot the origins of the salad, but it became an integral part of the festive new year table.
Russian layered salad - Shuba
Here is my version of the ‘herring under a fur coat’. For the dressing, I usually use only sour cream (it’s healthier), but you can substitute it with mayonnaise, or make it 50/50. Also I add an grated apple – the salad gets freshness, but for someone an apple is unnecessary here. The choice is up to you.

Herring under a fur coat or Russian Shuba Salad

  • Servings: 5-6
  • Difficulty: easy
  • Print
Ingredients
200-300g herring fillet, lightly salted
1 brown onion, finely chopped
2 large potatoes, skin on and boiled
2 large beetroot, skin on, boiled or roasted
1 medium carrot, skin on and boiled
1-2 hard-boiled eggs, chopped or grated, optional
1 juicy and sour apple (granny smith is great), coarsely grated, optional
Dressing
100-150ml (15-20% fat) sour cream, or as much as you like
2-3 Tbsp mayonnaise, optional
1 tsp dijon mustard, optional
salt, pepper to taste
Garnish
dill, parsley or chives, optional
Preparation method
  1. For the dressing, mix all ingredients and season to taste, or use only sour cream. You can spread the dressing with a tablespoon, or use a piping bag.
  2. Cover chopped onion with hot water and soak for 5-10 minutes, it helps to remove the bitterness. Then drain water.
  3. Drain any liquid from herring. Cut herring fillet into small cubes. Make the first layer – arrange herring on a serving plate. Spread onion on herring.
  4. Peel vegetables and coarsely grate or finely chop.
  5. Arrange a layer of potatoes. Cover with dressing. Also you can make potatoes the very first layer, if desired.
  6. Spread eggs, if using, and lightly cover with dressing. Also you can top finished salad with eggs.
  7. Arrange a layer of carrot. Cover with dressing.
  8. Arrange a layer of apple. Lightly cover with dressing.
  9. Finish with a layer of beet. You can only top with grated beetroot, or complitely cover the salad. Spread evenly some dressing.
  10. Garnish with chopped dill or chives, if desired.

The salad becomes much better if you refrigerate it overnight (cover the salad with a foil) or for a few hours.

Enjoy!
Herring under a fur coat
I’m linking this wonderful, tasty and festive salad to Fiesta Friday.

Vanillekipferl

 Winter holidays is my favorite time of the year (after birthday)! It seems like people smiling more often, and enjoying cold weather and upcoming festival! We putting up the Christmas tree and decorating it with beautiful toys, buying and wrapping gifts. It’s the right time to plan the holiday menu, whether to roast chicken or prepare the fish pie, make cherry strudel or chocolate cake..
The December would be incomplete without baking! Nothing says it’s holidays quite like Xmas cookies! There is something special about a tray filled with delicious vanilla or cinnamon-flavored cookies.
Baking cookies is such a fun and wonderful event! You can even organize a cookie party, call your kids or friends to help you, to share a holiday mood, and of course to enjoy eating all those treats you’ve made.
I bet you’ve seen crescent-shaped cookies somewhere or may be tried it. These biscuits are very popular in Europe, and especially in Germany, where they’re traditionally baked for Christmas, even though they originate from Vienna, Austria.

Make this season merry and delightful with irresistible vanilla biscuits, that just melt in your mouth! 🙂
German Vanillekipferl

Vanillekipferl - German Christmas Biscuits

  • Servings: 6-8
  • Difficulty: easy to moderate
  • Print
Ingredients
200g butter, cold and cut into small cubes
60g icing sugar
a pinch of salt
seeds from 1 vanilla bean, or 1 tsp vanilla extract, or vanilla sugar
1 large egg yolk
100g ground almonds
270g plain flour
+vanilla icing sugar*, for dusting
Preparation
  • *First, prepare your own vanilla icing sugar. Split vanilla pod lengthwise into two halves, and put it in a jar with icing sugar, close tightly. After 1-2 days you will get amazing naturally-flavoured vanilla icing sugar!
  • For the dough quickly mix butter with sugar, salt and vanilla. Mix in egg yolk. Sift flour and add it to the dough along with almonds. Qucikly knead the smooth dough. Cover with cling wrap and refrigerate for 1-2 hours.
  • Divide the dough and form rolls 1.5-2.5cm in diameter. Cut each roll into 5-6cm length slices, and form the crescent shape biscuits.
  • Put biscuits on a baking tray lined with parchment. Bake in preheated 200C oven for 10-15 minutes.
  • Put vanilla icing sugar in a plate, and roll still warm biscuits in it.
  • Let the biscuits cool on a rack.

Enjoy!

German vanilla biscuits