Appetizer

Potato pizza-pie

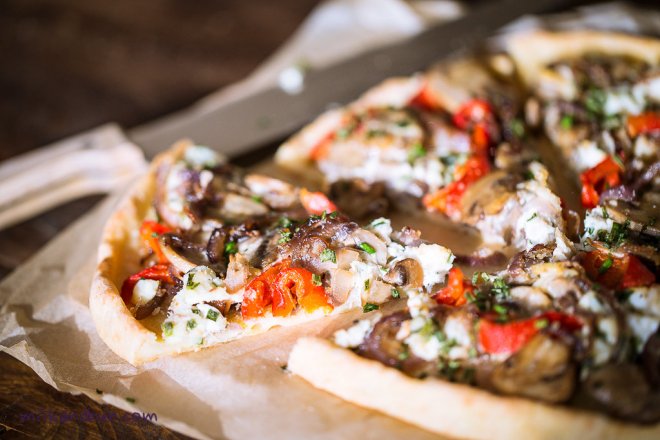
 One day I decided to make a savory potato pie, but to use potato in the crust instead of filling. I imagined myself a good fluffy pie with a creamy filling of fried mushrooms, onions and something else. When I made and rolled out the dough, I realized that it looks more like a pizza not a pie. 😀 However, the potato crust suit nicely to all these colorful ingredients which I used, including some cooked fish leftovers. Grilled bell pepper and bright spring onion gave an extra kick to this pie. Honestly, I was surprised how good and delicious the pizza-pie turned out. 🙂
Potato pizza-pieI’m co-hosting FF#104 with lovely Hilda@alongthegrapevine (she is so creative and has lots of unusual recipes on her blog); so, I’m inviting everyone to join, we share many delicious food there, and you can chat with other foodbloggers and of course don’t forget to like and say “wow, yummy or just hi”! 😀 Read the guidelines here. Happy cooking! 🙂

Potato pizza-pie with fish, bell pepper and mushrooms

  • Servings: 4-5
  • Difficulty: moderate
  • Print
Ingredients

Crust

200g/2 medium potatoes
1 bay leaf
20g butter
1 medium egg
sea salt, to taste
2-3 Tbsp grated parmesan, optional
~150g plain flour
Filling
100-150g cooked fish fillet leftovers (I used sea bream)
a pinch of freshly grated nutmeg, optional
1 meduim red bell pepper, grilled or roasted, sliced
150g mushrooms
1 large red onion
a bunch of spring onion or chives, chopped
100ml double cream or 30-35% fat cream
Other
1 tbsp olive oil+1 tbsp butter, for frying
sea salt, freshly ground white pepper
Method
  1. Clean, peel potatoed, cut into fourths. Put in a pan along with some salt and bay leave, cover with water and boil until ready. Drain. Add butter, season with salt and mash potatoes. Stir in egg. Mix in parmesan, if using. Sift the flour into potato mixture, combine into a soft dough (add some more flour if the dough is too wet).
  2. Grease the baking paper (to suit your baking tray). Roll the dough out on this paper. Put in a freezer for 5-7 minutes (or in a fridge for 15 minutes).
  3. Meanwhile, prepare the filling. Slice mushrooms and onions, fry on a medium-high heat in a mixture of oil and butter (you can do it in a one large frying pan, but don’t mix it-put side by side and fry). Stir 1/3 of the cream into mushrooms, and season to taste. Set aside.
  4. Add some butter into the same pan and chopped spring onion (reserve some for garnish, optional), saute for 2 minutes on a low heat –  you only need to soften the onion.
  5. In a bowl, mix fish with the remaining cream, sautéed spring onion and nutmeg, season to taste.
  6. Sprinkle crust with breadcrumbs. Bake it without filling in a preheated 180C oven for 15 minutes.
  7. Spread onion, fish, mushrooms and pepper slices over the crust. Bake for 15-17 minutes more.
  8. Sprinkle with remaining spring onion (optional). Serve warm.
Enjoy!

I’m also sharing it with Saucy Saturdays, Foodie Friends Friday, Foodie Friday

Beetroot dip with coriander crackers

 This is an extremely delicious beetroot dip that is super easy to prepare and is a crowd-pleaser. The bright beetroot dip can be made as a tasty and healthy appetizer for either home-parties or just your family, especially if you serve it with lots of homemade coriander crackers. Appetizer made from scratch adds a special touch to any kind of gathering. 🙂 It’s also a healthy snack anytime – just spread it over toasted bread, or use it as a wrap filling.
Beetroot dip
You can make the dip even without cheese, but I like it this way more. Also try to add feta or other soft white cheese instead of cream-cheese, walnuts is a another good substitute for pine nuts.
Beetroot dip with coriander crackers
 

Beetroot dip with coriander crackers

  • Difficulty: very easy
  • Print
Keep covered in the fridge up to 3 days.
Beetroot dip
Ingredients
150g cooked beetroot (boiled or roasted), chopped
1 small garlic clove, minced
1/2-1 tsp cumin, crushed
1 tbsp EV olive oil
2 tbsp Philadelphia cheese
1 tbsp parmesan, finely grated, optional
1 tbsp pine nuts, lightly roasted
sea salt, freshly ground pepper, to taste
  • Put all ingredients, except the pine nuts, in a small bowl of blender and blitz until smooth. Season to taste, add pine nuts and pulse a couple of times to keep some nuts pieces; if you like more smooth-pulse again.
  • Garnish with pine nuts and some grated parmesan, if desired. Serve with crackers or toasted bread.
Coriander crackers {Make approx 18 crackers}
Ingredients
130g plain flour+some for kneading and rolling
1/3 tsp baking powder
1/2 tsp fine salt (want less salty, add less salt)
some freshly ground white pepper
1 tsp whole coriander seeds, crushed or ground
1/2 tsp cumin seeds, ground
40 ml EV olive oil
40 ml water+1/2 tsp white sugar
  • In a mixing bowl, combine flour, b.powder, salt and all spices. Mix in olive oil.
  • Dissolve sugar in water and pour into dough, knead the dough. Cover with plastic wrap and keep to rest for 30 minutes at room temperature.
  • On a lughtly dusted surface, roll the dough (approx 3-4 mm thick) and cut into 5×5 cm squares.
  • Transfer to a lined baking sheet and bake in preheated 190C oven for 15 minutes or until golden-brown.
  • Cool&Enjoy!

Russian Winter Salad (Olivier salad)

 This salad is a traditional dish in Russian cuisine, and most of the time it is associated with New Year celebration, when it’s always served on a festive table along with another popular salad – “shuba”.

 The very first and original version of this salad was invented in the beginning of 1860s by chef Lucien Olivier, who was the owner of the renowned Moscow restaurant “Hermitage”. “Olivier Salad” quickly became popular among restaurant visitors, the salad brought him a great fame and became the signature dish. The recipe and especially the dressing was kept in a big secret, and unfortunately the fact is that the exact recipe is still unknown. But according to some notes, it’s known that the salad contained hazel grouse, veal tongue, black caviar, fresh salad leaves, crayfishes or lobster, some pickled, fresh cucumbers, capers and boiled eggs. And the secret dressing was prepared from fresh raw eggs, some secret herbs and olive oil. 
 As you can see, all ingredients were posh and expensive. So, lately during Soviet time, these fine ingredients were replaced by cheap and widely-available, like boiled kolbasa (bologna sausage) or meat, boiled potatoes and carrots, pickled cucumbers and peas, dressed with store-bought mayonnaise instead of home-made French dressing. Such simple and nourishing salad was widely-popular, and soon it became a staple and traditional dish of Soviet holiday dinner, and particularly of New Year’s Eve. Lately, it’s even got a second name – “Winter Salad”. Beyond Russia this salad is often called as “Russian Salad”.Russian Winter salad
 Nowadays, the salad is still a traditional part of New Year celebration, but there are lots of versions – with boiled beef or chicken, beef tongue, fish and caviar, fresh or pickled cucumbers and so on. My recipe is a common version of the Winter Salad – with boiled beef, pickled cucumbers and mayonnaise. It’s a little bit on a dark/unhealthy side of my diet 😀 but consuming it on the holiday dinner is also a part of Russian tradition, so eating it once a year don’t make anyone fat. 🙂 Enjoy!
Olivier or Russuian Winter salad

Russian winter salad (Olivier salad)

  • Servings: approx 8
  • Difficulty: easy
  • Print
You can garnish the salad with some peas and chopped dill or parsley.
*Add more cucumbers if using small gherkins.
Ingredients
350g beef (one whole piece, without any bones)
300g/ 2 large potatoes
1 large or 2 medium carrot
4 medium eggs
4 medium pickled cucumbers*
1/2 medium brown onion
1 can of green pea
mayonnaise, to taste
salt, to taste, optional
Method
  1. In a pan, put meat and cover with cold water, bring to boil, reduce the heat to medium, cover and simmer for about 50 minutes or until meat is ready. Completely cool and cut the meat into small cubes (about 1 cm).
  2. In another large pan, put potatoes and carrot in their skin, cover with water, bring to boil, reduce the heat to medium, cover and simmer until veggies are soft. Cool, peel and cut into small cubes (about 1 cm).
  3. In another pan, hard-boil eggs. Also cut into cubes.
  4. Finely chop the onion, put in a bowl, drizzle with some apple vinegar and cover with hot water. Leave for 15 minutes, then drain.
  5. Also cut the cucumbers into small cubes.
  6. In a large serving bowl, add all ingredients along with drained peas. Dress with mayo to suit your own taste.
You can keep the undressed salad in the fridge up to 2-3 days.
Enjoy Russian Winter Salad!

Vinegret

 Merry Christmas to you dear reader, to all amazing foodbloggers and friends, to all lovely people who is celebrating this bright and warm holiday!

 I’m sharing with you this wintery salad, that’s very popular and loved among Russians. It’s a vegetable salad, that usually served cold as a starter (before the main course) or lots of people would like to have a huge bowl of this salad any time during the day.

 Similar salads were known already in 19th century, which were made from boiled vegetables and dressed with oil and vinegar. The name ‘vinegret’ came from French word “vinaigre” – vinegar. The legend says that during the reign of Russian tsar Alexander I, French chef Antoine Careme was working for the Russian court and once he saw how Russian cooks prepared a vegetable salad and dressed it with something similar to vinegar. He wanted to know what was the dressing and asked ‘Vinaigre?’. As for cooks, they thought the chef named the salad itself.. Since then the salad became known as ‘vinegret’.Vinegret-Russian salad
 The salad is very simple itself and easy to prepare, it consists of few main and irreplaceable ingredients: beetroot, potato and carrot. Plus some points below and you can make it too:
-you can either boil beets and potatoes or bake it (in their skins);
-green canned peas are added most of the time, but you can skip it;
-not the least ingredient – pickled cucumbers or cabbage, you can use one of it or both;
-chopped fresh onion can be omit or replace with spring onions;
-some chopped fresh dill make the salad only better;
-dress it simply with aromatic sunflower oil (or olive oil), some vinegar is optional.
 All vegetables should be cut into small cubes (0.5-1cm). And the quantity is next: 1 part beets+1 part potatoes+1/2 part carrot+1 part pickled cucumbers or cabbage (I prefer and recommend 2 parts)+1/2 part peas+1/3 part onions.
Vinegret (modern presentation)
Moreover, today is a big day for Fiesta Friday party! It’s #100! I absolutely love it and enjoy it every time, so many recipes and lovely bloggers, fun and chat! Let’s party!!!

Vinegret

  • Servings: 4-6
  • Difficulty: easy
  • Print
*Cucumbers shouldn’t be too sour or too sweet.
**Try to buy Russian pickled cabbage (it should be crunchy!).
***I used small can 200g, drained weight 140g.
Ingredients
1 medium beetroot (300g)
300g potatoes
1 medium carrot
6 small or 2 medium pickled cucumbers*
200g Russian pickled cabbage**
1 small can of green peas***
small bunch of fresh dill, chopped
extra virgin olive oil, for dressing
salt and black pepper, to taste
Preparation method
  1. In a large pan, add cold water, put beetroot, potatoes and carrot (don’t peel them). Bring water to boil, reduce heat to low-medium, cover with a lid and simmer for 1 hour or until veggies are soft and ready. Drain, leave to cool completely. Peel veggies and cut into small cubes.
  2. Cut cucumbers into small cubes.
  3. In a large serving bowl, mix all vegetables with peas and dilll. Season with salt and pepper, dress with oil, stir to combine and serve.
Serve vinegret with sliced rye bread. Enjoy!
Russian vegetable salad -Vinegret

Oven fries and homemade potato seasoning

 Many of us like potato fries/chips, and I’m not an exception. 😀 Yes, I know that they are not healthy.. But if your diet is balanced and healthful most of the time, you can have one cheat day during a week or so. However, it’s certainly preferable to make your own homemade fries. And I mean roasted fries instead of those deep-fried and greasy. My secret to great and tasty fries is a special spice mix, that I prepare myself: for that you need to combine rosemary, turmeric, paprika and some other spices (look at the recipe below). This seasoning suits perfectly to both regular and sweet potatoes. Once tried, you might want to make a larger jar next time! 😉Oven roasted potato fries

 Enjoy your aromatic snack!

Oven fries and homemade potato seasoning

  • Difficulty: easy
  • Print
Oven roasted fries
Sweet or regular potatoes
Potato seasoning
Olive oil
  • Wash and peel potatoes. Cut them into slices (or wedges if you like), put in a large bowl of cold water. Soak for a 20-30 minutes.
  • Preheat oven to 200C/400F.
  • Drain potatoes and pat dry on a kitchen towels (or use kitchen paper).
  • Put potatoes on a baking tray, generously sprinkle with potato seasoning and drizzle with a bit of oil. Spread into one layer.
  • Bake for 30 minutes. If you have a broiler – broil it for 6-7 minutes more.
  • Enjoy as is, or with your favourite sauce or as a side dish to chicken or meat.
Potato Seasoning
2-3 tsp dried rosemary (whole or crushed)
1/2 tsp dried oregano leaves, crushed
1.5 tsp turmeric
1.5 tsp coriander, crushed
1 tsp sweet paprika
1/3-1/2 tsp hot smoked paprika
1/2-1 tsp curry, optional
sea salt, to taste
freshly ground coarse black and white pepper, to taste
Happy cooking!