Monthly Archives: March 2015

Pirogki with spring onions and eggs

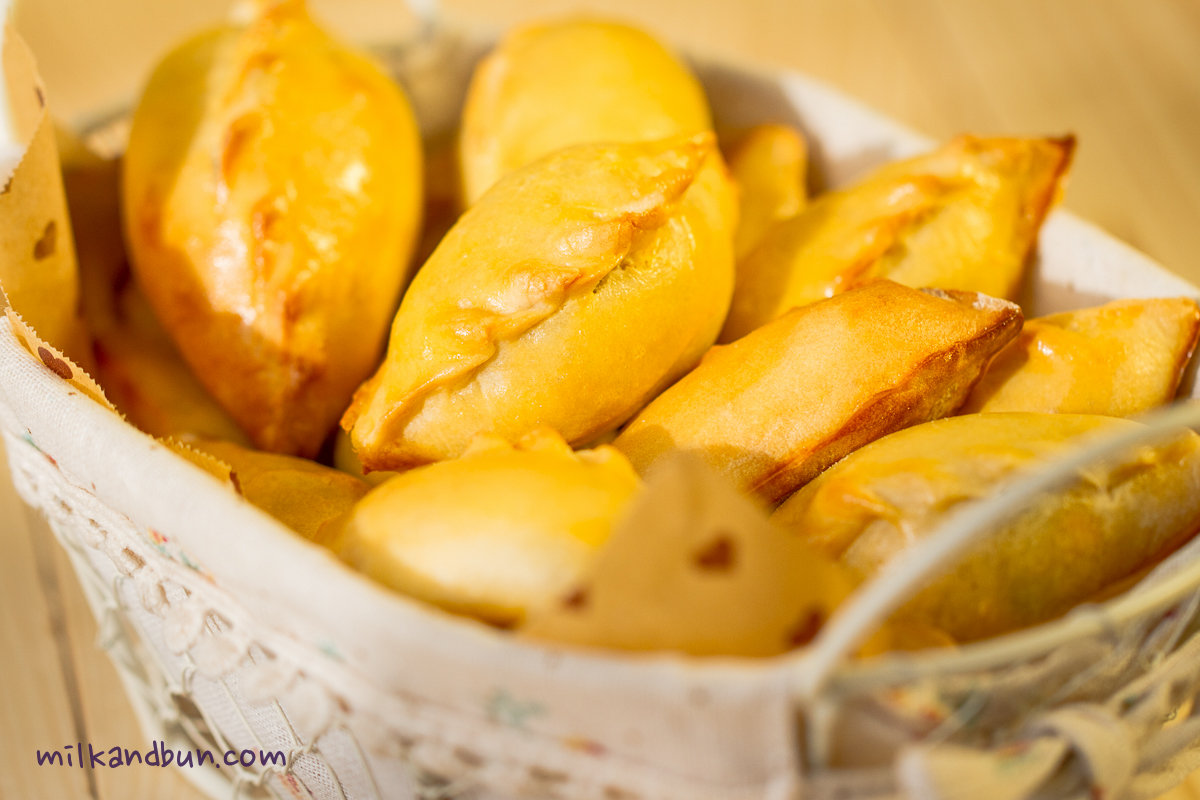
 Pirogki means small pies in Russian. Most of the time yeast dough is used for these delicious pirogki, like I made for Kulebyaka pie. But making such dough is a time-consuming, and you need to make lots of small pies or one big. I suggest you to try the dough based on kefir or any other soured milk product, it’s very quickly to prepare, and you can use both sweet and savory filling. Today I chose one of favourite filling in my family – a mixture of chopped spring onions and hard-boiled eggs. Pirogki with this filling reminds me warm days in Russia, first of the spring crops, including young and juicy spring onions from parents’ garden and amazing aroma of these pies. For my husband, it brings memories about his grandmother, the days she was cooking these pies and serving with a jug of fresh milk. 🙂Pirogki with spring onion and eggs

Pirogki with spring onions and eggs

  • Servings: 3-4
  • Difficulty: easy
  • Print
*Using sour cream is optional, you can substitute it with the same amount of kefir or creme fresh. 
These pirogki is also good with a soup instead of bread.
Ingredients
220-250ml full fat kefir (buttermilk or laban)
1/2 tsp baking soda
1/2 tsp salt
1 tsp white sugar
2 tbsp sour cream*, optional
1 large egg
2 tbsp sunflower oil
400-450g plain flour
Filling
150g spring onions, chopped
1 tbsp butter
4 large eggs, hard-boiled, chopped
S&P to taste
Egg wash
1 large egg yolk
1 tbsp milk
Preparation method
  1. In a large mixing bowl, add kefir, soda, salt, sugar and mix. Leave for 4-5 minutes. Add sour cream (if using), egg, sunflower oil and mix well. Sift the flour into mixture, stir to combine. Cover with plastic wrap or kitchen towel and leave to rest for 20-30 minutes. If you don’t have time – rest it for 10 minutes or for a time while you’re preparing the filling.
  2. For the filling, in a small frying pan melt the butter, add chopped onions and saute on a medium heat for 5-7 minutes until soft. Don’t let it burn. In a bowl combine soft spring onions with eggs, season to taste.
  3. Roll the dough into 10-12cm circles, add 2-3 tsp of the filling into each circle, seal the edges.
  4. Arrange pirogki on a lined baking tray. Brush each pie with egg wash {for egg wash whisk ingredients together}. Bake in preheated 180C oven for 20-22 minutes or until golden.
  5. Serve warm with a glass of milk.
Enjoy! ❤
PiesEggsOnion
Russian pirogki - small pies
Sharing at Fiesta Friday party, wonderful party where Angie is a lovely hostess, and Margy and Selma are co-hosts this time.

Braised Rabbit with red wine, prunes and thyme

 I’m sure you know that Easter is on the way (Catholic falls on April 5 and Orthodox April 12), and you’re probably planning what to cook, or searching your notes with traditional recipes. I think some of you have a special main course recipe for this occasion, or may be it’s a wide range of recipes. What will you choose this year? An elegant dish or simple&casual? I think, with spring bringing nice and pretty weather, that you’re likely to be in the mood for something hearty and light! 🙂Braised Rabbit I’ve always been partial to rabbit; when I’m visiting my parents in Russia I’m always pleased to eat a rabbit stewed in sour cream. It’s always tender and delicious, of course because it’s prepared by my mom. 😀 Today recipe is elegant and great for a special dinner! I’d like you to try rabbit with prunes and thyme, braised in red wine. It requires few ingredients to be transformed into a flavoursome meal! Enjoy!Braised Rabbit with prunes, juniper berries and thyme

Braised Rabbit with red wine, prunes and thyme

  • Servings: 3-4
  • Difficulty: moderate
  • Print
Ingredients
1 rabbit, 1.3-1.5kg
water
1-2 tsp apple or wine vinegar, optional
2 tbsp olive oil
20g butter
1-2 garlic clove, peeled, chopped
5-6 shallots or 1 onion, chopped
1 bay leaf
4 black peppercorns, optional
4-5 juniper berries
12-15 prunes, pitted
4 springs thyme or 1 tsp dried
150ml dry red wine
100ml or more hot water, if needed
sea salt and white pepper to taste
Garnish
boiled or roasted potatoes
sour cream
Preparation method
  1. Joint the rabbit, wash it and put in a large bowl, fully cover the meat with water, add vinegar if using, then cover with a wrap and leave to marinate for 1-3 hours. It helps to make rabbit meat more tender and get rid of any unpleasant smell.
  2. Heat the oil and butter in a heavy-bottom pan on a medium-high heat.  Add the rabbit pieces and brown each side for 6-8 minutes or until golden colour. Take out the rabbit pieces and place aside. Don’t clean the pan.
  3. Reduce the heat to medium, add onions, garlic, peppercorns (if using), juniper berries, bay leaf, some thyme leaves and sauté for 3-5 minutes or until onion have softened. Add rabbit, pour over wine and scrape up the bottom of the pan. Bring to boil, reduce the heat to medium and simmer for 15 minutes.
  4. Fold in prunes and remaining thyme. Season to taste. The liquid should come half way up the rabbit pieces. So, add some water, if needed. Reduce heat to low, cover with a lid (keep a small slit) and braise the rabbit for 45 minutes. Now turn the rabbit pieces on the other side, adjust the seasoning, again cover the pan with a lid and braise for further 40-45 minutes. The rabbit should be easily pulling off the bone.
  5. Serve with sliced boiled/roasted potatoes, or rice. Add a tablespoon of sour creme, if desired.

Best Ever Plum Crumble

 I discovered crumbles not long time ago, but immediately fall in love. Thank to the British for this amazing, simple and absolutely delicious dish! I’ve already tried various sweet crumble recipes – with peaches, mixed berried, pears.. I love them all! But.. Once I stumbled upon a new crumble recipe by James Martin, he is a well-known English chef; the recipe called for plums, spices and wine. And what do you think – it’s the best crumble I’ve ever made and tried! Plums with spices sautéed in red wine remind me mulled wine, and it’s incredibly tasty! This crumble is very aromatic and delicious even without ice cream on top! I slightly adapted the recipe – added oats and chopped nuts, walnuts and/or pistachios is a nice crunchy addition here.Plum crumble

Best ever plum crumble

  • Servings: 2
  • Difficulty: easy
  • Print
Ingredients 
20g butter
7-8 dark plums, halved, stones removed
1 vanilla pod or 1 tsp vanilla extract
1 star anise
a pinch of fresh nutmeg
1 cinnamon stick
20ml water
60ml red wine
2-3 tbsp golden syrup (I used honey)
2-3 tbsp brown or raw sugar
Crumble topping
50g plain flour
30g oat flour or fine oats
2 tbsp demerara sugar
40g butter, softened
2-3 tbsp chopped pistachios or walnuts
To serve
vanilla ice cream
Preparation
  1. Preheat oven to 200C.
  2. Heat the butter in a pan over medium heat. Add the plums and fry for a few minutes.
  3. Add the split vanilla pod, star anise, nutmeg and cinnamon stick to the pan. Add the water, red wine, honey and sugar and bring to the boil. Reduce the heat and simmer for 5-6 minutes, until the plums break down to a thick sauce. Transfer plums with sauce to one or 2 individual baking dish.
  4. For the crumble topping, mix the flours and sugar together in a bowl. Rub in the butter with your fingers until the mixture resembles breadcrumbs. Mix in chopped nuts.
  5. Sprinkle the crumble over the plums and bake in the oven for 20-25 minutes, until golden-brown.
  6. Remove and allow to cool slightly before serving with ice-cream.
Enjoy!

Plum crumble-2

Mimosa Salad

 Hello guys! It’s a very special Friday for me. I’m so glad and excited that I’m co-hosting the wonderful virtual party – Fiesta Friday by Angie, and Jhuls is another great co-host this time. I’d like to invite everyone and each of you to join the very-friendly party! Let us know that you’re joined by linking your post to Angie, me and Jhuls. Of course, will be lots of appetizers and welcome drinks, and you can eat&drink non-stop! 😀 Newbies could find the guidelines here. Another point is to bring your favourite dishes and put the link here, so every blogger can grab a slice of your cake or tuck in the stew while chatting. You’re also welcome to visit and like other bloggers’ posts and of course you can leave a comment or just say hi; it’s such a lovely possibility to find new blogofriends, have a small talk and plenty of fun!Mimosa Salad
 I have decided to bring this nice-looking salad to the party, it’s Russian layered salad or to be exact Soviet salad, but still popular in many ex-USSR countries. In Russia we have lots of layered salad recipes, so many that I even don’t how many. 😀 This one is associated with spring (thou, also popular for New Year), Women’s Day and it’s named after the beautiful flower – mimosa. Last layer of the salad is crumbled egg yolks, which remind little yellow blossoms of mimosa. The main ingredient is canned fish here, so the salad is very budget and at the same time tasty, plus looks festive (that was important during deficit time). Usually saury/saira fish is used in ‘mimosa’, but salmon species is also good here, like red or pink salmon. I’ve tried to make it with tuna and can’t recommend it, its meat too dry for this salad, but if it’s the only canned fish you can get – add more sour cream or mayonnaise. Many variations exist – with or without potatoes, with cheese, spring onions, grated butter, etc. Better to prepare this salad some time in advance before serving to allow all layers to soak; so you can make it a night ahead.
Russian Salad-Mimosa

Mimosa Salad

  • Servings: 4-6
  • Difficulty: easy
  • Print
To make salad more rich you can add some grated butter – between carrot and yolks layer. 
Ingredients
1 large or 2 medium potatoes
1 large carrot
3 large eggs or 4 medium
250g canned fish (I used red salmon)
1 small onion, finely chopped
150-200g mix of sour cream and mayo (or only mayo)
some fresh dill, optional
salt to taste
Method
  • Wash potatoes and carrot, don’t peel. In a large pot with water, add potatoes, carrot and boil it until ready. Cool, peel the skin, then grate on a small or medium grater into separate bowls. Set aside.
  • Hard boil the eggs, cool and separate whites and yolks. Finely chop or grate.
  • Put chopped onion into a small bowl, cover with hot water and keep for 10 minutes. Drain the water.
  • Drain the fish and mash it with a fork.
  • Prepare a deep serving bowl or another serving plate. Arrange grated potatoes evenly on the bottom. Spread some mayo.
  • Make fish layer, then add chopped onion and spread more mayo.
  • Arrange egg whites and spread again mayo.
  • Arrange grated carrot and spread again mayo.
  • Arrange egg yolks. It was the last layer.
  • You can sprinkle the salad with chopped dill, if desired, or decorate whatever you want. Enjoy!
You can cover the salad with a piece of foil and keep in the fridge for 2-3 days.

Mimosa-Russian layered salad

Pear&Blackberry Tart

 Last weekend I wanted to make a cake, I was dreaming about a huge layered cake with delicious and sweet cream, topped with chocolate or strawberries, or blackberries.. At the end of the day I realized that I can’t decide which one to make and I don’t have all required ingredients. 😀 But I have always been a person that needs something sweet after dinner. I wanted a dessert to satisfy my sweet tooth, and better with cream! So I’ve come up with this beautiful and absolutely delicious ‘pear and blackberry tart’. Honestly speaking, I haven’t made this recipe a dozen or even a couple of times, it was perfect from the first attempt! Nutty shortbread base, tender whipped ricotta cream, pear slices and blackberries – all those things merged together into divine combination. I believe that you would find this dessert to be as delicious as it looks! You just need to go to the kitchen, cook it and enjoy! 🙂 I will make it again for sure!

Pear&Blackberry Tart

Pear and Blackberry Tart

  • Servings: 4-6
  • Difficulty: moderate
  • Print
You can use any favourite fruits and berries, like strawberry&blueberry, raspberry&nectarines.
Ingredients
Short pastry (base)
1 large egg, at room temperature
100g plain flour
75g butter, cubed and softened
35g fine sugar
30g ground almonds
Topping
100ml whipping cream (30-35%), cold
1+1 Tbsp icing sugar
1 tsp cognac or brandy, optional
100-120g ricotta
1 tsp vanilla extract
1 tsp lemon zest
1 large pear, sliced
1 Tbsp lemon juice
8-10 blackberries
2-3 strawberries, sliced, optional
1 Tbsp white chocolate chips
  1. Whisk the egg and set aside a half (a bit less then half) for a glaze.
  2. To make the dough, in a large mixing bowl or food processor, mix flour, butter, sugar, half the egg and almonds until combined. Tip dough out onto a floured surface and bring together with hands.  Make a flat disk, cover with plastic wrap and chill for 30-40 minutes in a fridge.
  3. On a lightly floured table roll the dough into 21-22cm circle. Brush with remaining egg. Transfer to a paper-lined baking dish.
  4. Bake in preheated 180C oven for 25 minutes or until golden. Allow to cool completely.
  5. Meanwhile, in a bowl beat cream with 1 Tbsp icing sugar and cognac, if using, until soft peak begin to form. In another bowl, combine ricotta, vanilla, lemon zest and sugar. Add ricotta mixture into whipped cream and whip until smooth for a 1-2 minutes.
  6. Spread cream on the base. Sprinkle pear slices with lemon juice. Arrange pear slices, blackberries and strawberries, if using, on the cream, and sprinkle over chocolate chips. Dust with extra icing sugar, if desired. Enjoy!

PBB tar-2